Showing posts with label Christmas. Show all posts

Thursday, December 13, 2012

Mayhem

Today's the start of 2 1/2 weeks of craziness in our household - three birthdays and Christmas in the space of 19 days.  Here's a quick rundown of what I've been up to in the lead-up to birthday season...


I made two lengths of this felt bunting (no-fray => less stitching required) to decorate the church hall for the kids' party.  I printed the letters onto paper, then cut the paper and felt together and stitched them on with a straight stitch.  Reasonably quick, and we'll use it for years to come.


Made to measure felt crown (double layer of felt for more body), with lace and ric-rac that used to belong to my Grandma.


The Kinderboy and I picked just under 11kg of [tiny but sweet] apricots from our tree, then enlisted the Ipswich nieces to help us sort and cut them.  We gave away some, ate some, and swapped some for lemons with the lady across the road, and now I have 15 jars of apricot jam cooling downstairs (not the best job on a 35 degree day, but the apricots don't give you a choice!)


Last of all, I had a morning off and finally finished some stretch linen pants for myself from the Spring/Summer 2012 Ottobre Woman magazine.   Strangely, I had to shorten them by 20cm to get to the length shown in the magazine.  I'm short, but not that short, so I'm not sure what the story is - its the first time I've used any of their women's patterns, so I guess I'll keep an eye out on sizing in the future as well.  Sorry about the lack of modeled shots - I'm lousy at taking them myself, and too self-conscious to ask the family to do it!


Next on the agenda are some class Christmas cards (as shown here), and finishing off some Christmas presents.  I have a hankering for new clothes for myself though, and Darn Cheap Fabrics has a sale on, so a diversion may be on the cards.  In the meantime, I'm going to settle for heading over to Village Voices for more crafty ideas (it's where I first saw the cards too).

Saturday, December 3, 2011

Introducing Gaspard & Lisa

Its been quite a productive day in our house - this morning I finished the Christmas Stars quilt, and this afternoon the boys and I finished 'Gaspard' and 'Lisa' - their presents for the Newbie.  They're proud of the fact that they made the bears themselves (with varying levels of assistance - the Kinderboy got to choose his fabric and trims, trace around the pattern pieces, supervise sewing and help to stuff; the Schoolboy also got to 'steer' the fabric through the sewing machine whilst I used the presser foot).  We've named them after the characters in the TV show that's currently on ABC kids.


The pattern came from this book:
I borrowed it from the library with a view to making some stuffed birds for the Christmas tree / as party favours for the Kinderboy's birthday next weekend, but found that there were so many projects I wanted to try that I've actually ordered a copy of the book for myself to keep.  The bears and also the birds are quite simple, and readily achievable by primary school aged kids if you're after a craft project.

Oh, and as you can see, the quilt is now dry and the tree up and decorated.  Time to sit down I think!

Christmas stars completed!

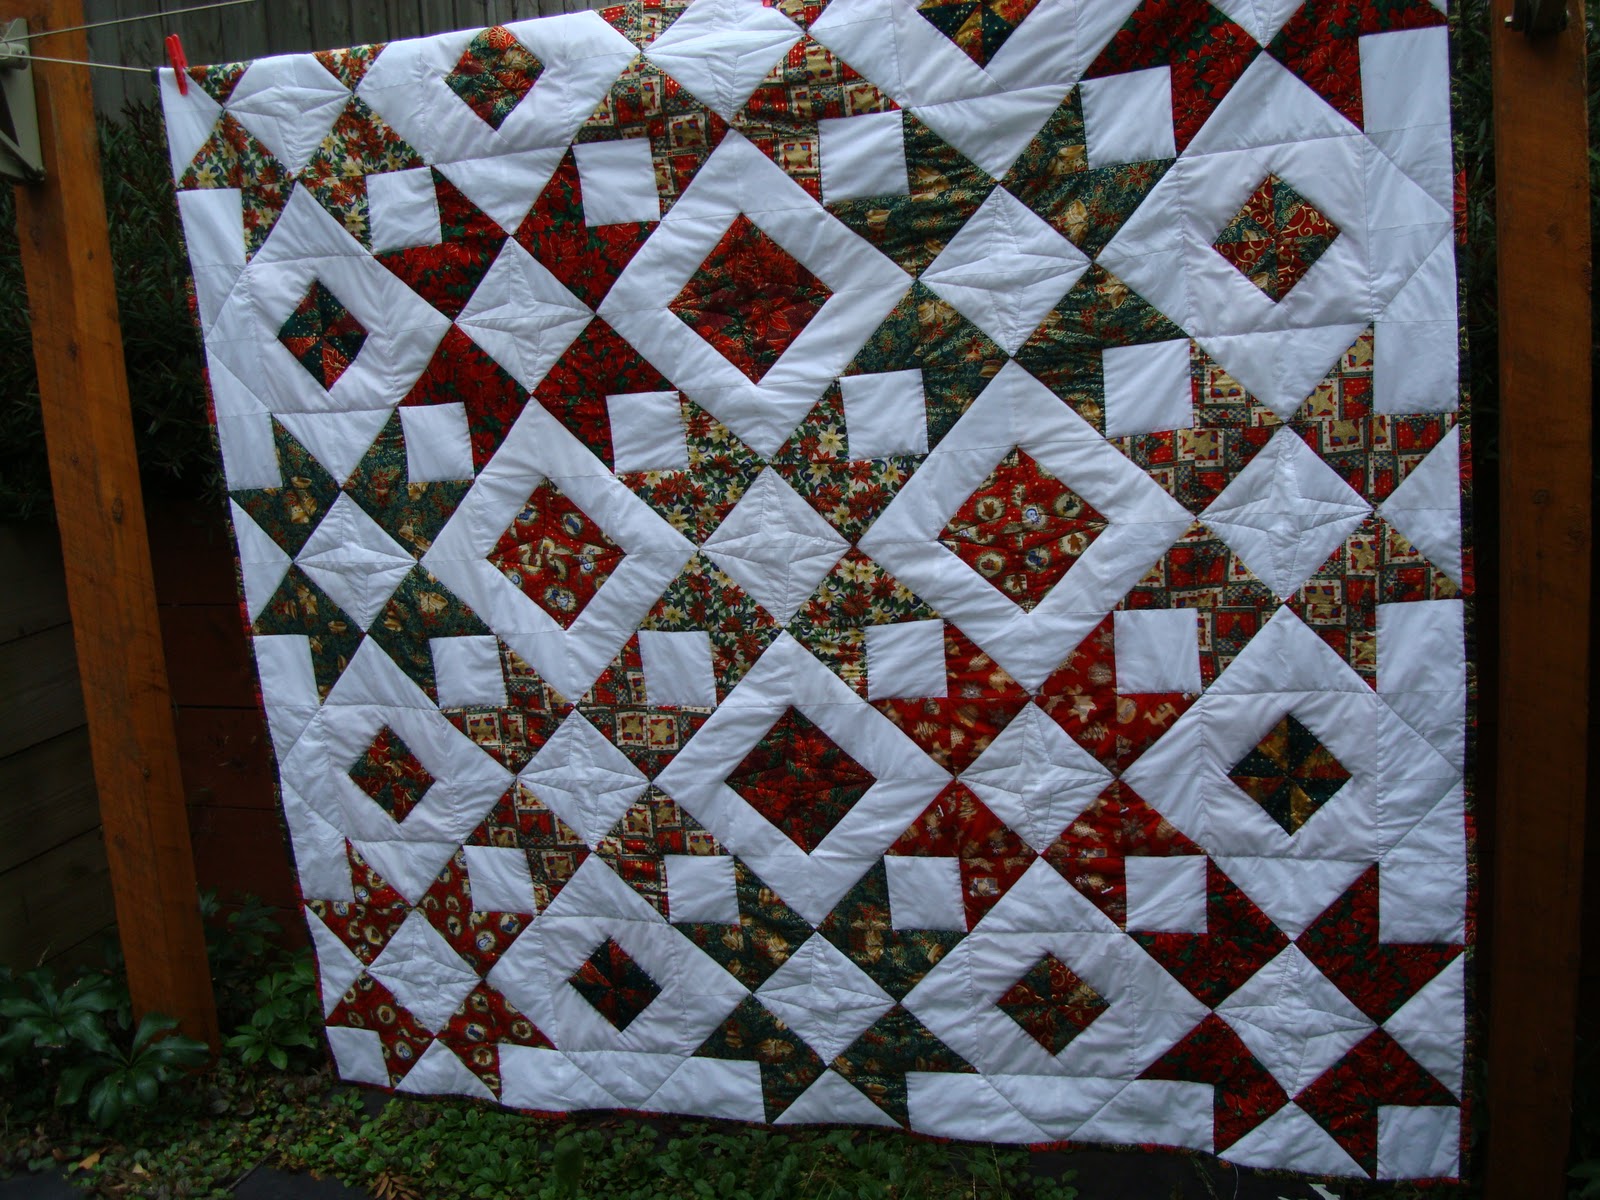
This morning I finally finished the 'Christmas Stars' quilt that I started as part of the Chasing Cottons Quilting 101 classes way back in April (two days late according to the Schoolboy, who wanted to put up all the Christmas decorations on Thursday)!  Here it is having been washed and hanging on the line to dry on a dull Melbourne summer's day:
 

 I contributed a tutorial to the course, and thought that participating would be a good way of using up some Christmas fabric to make a quilt for under our tree (we put it on a coffee table, and I'm always worried about scratches).  Part way along I found out that I was pregnant, and didn't want to finish the quilt until I had some fabric to match the Newbie's Christmas stocking to include.  Well, I've made the stocking now, and got extra fabric so I could use some for the quilt binding and behind the label on the back.

Here's some more shots just for good measure...


The fabric's a mixture of leftovers from our stockings, as well as presents I've made for people over the years.  The predominantly red floral is one that I bought as a remnant 'just in case' we had need of a fifth stocking a few years ago and cut into triangles only to find out a couple of weeks later that I should have kept it for its original purpose.

I quilted in the ditch around the stars and squares (its the first time that I've done this, and my work isn't exactly perfect, but I'm reasonably happy with it), then added four-pointed stars in the centre of the stars and the larger coloured squares.

Saturday, November 19, 2011

Its beginning to feel a lot like Christmas...

... my apologies!  It really is to early to be thinking about Christmas, and I can't face any sort of present list yet, but there are some craft items on my 'to do' list that I really want to cross off before the start of December.  Last night I finished the first of them: a Christmas stocking for the Newbie.  In theory this could have waited - our tradition is that we hang them on Christmas Eve, but as Christmas and new babies come hand-in-hand in our household, making a stocking just seems like part of the birth preparations.
I've made each of us Christmas stockings, and a friend asked me for the pattern some time ago.  Looking at my instructions for her I was a little confused by the whys and wherefores of some of my instructions, so I thought I'd revise them for you.  I've also tried my hand at preparing a PDF pattern based on my design.  If you print it at 100% you'll end up with a stocking that's around 47cm from the top to the heel and 40cm from heel to toe.

I'm going to make one of Tania's Voucher Wraps (but slightly smaller - mine will measure 6" by 11" unfolded) with some of the leftovers.
If you'd like to have a go at your own version of my Christmas stocking feel free to download the pattern (please only use it for your own personal purposes - don't reproduce it/sell them).  Some of the great looking examples here might provide additional inspiration for fabric choices.  There are written instructions in the pattern download, but if you're after visuals as well here goes:

What you'll need:

Main fabric & calico/lining (115cm wide)
70cm of each
(180cm will do 3 stockings)
Cuff fabric (115cm wide)
20cm
Ribbon/webbing (~2.5 cm wide)
~70 cm
Iron on interfacing (light-medium weight)
20cm (if 115cm wide this should do two stockings)


What to cut:
2x      Stocking shape from main fabric (add 1cm seam allowance all round)
2x      Stocking shape from calico (add 1cm seam allowance all round)
2x      18cm x 56cm rectangles from cuff fabric
1x      18cm x 56cm rectangle from interfacing


How to sew it up:
1.          With right sides facing, stitch front and back stocking pieces together using a 1cm seam allowance, back-stitching a few stitches at the start and end of the seam, and leaving the top open.  If you like, then zig zag/overlock the edges (I have used a straight stitch to neaten the top of the stocking, but as the whole lot is going to be lined I haven’t worried about the rest of the edges).
2.          Do the same with the calico/lining.
3.          Clip seam allowance to curves.
4.          Turn the main fabric stocking through the right way, and press.
5.          Insert the calico stocking inside the main fabric one, matching seams and top.
6.          Apply the interfacing to one of the cuff pieces.
7.          With right sides, facing stitch the cuff pieces together along one long edge (this becomes the lower edge).
8.          Press flat, with seam allowance toward the un-interfaced half.
9.          With right sides facing, stitch the back seam (short edges) of the cuff, then press open.
10.       Fold the cuff in half and press.
11.       Insert cuff inside the top of the stocking, matching the back seam on the cuff with that on the stocking, and ensuring that the non-interfaced side of the cuff is facing the stocking lining (ie. When turned over this will be on the outside).
12.       Fold the ribbon/webbing in half, and pin between the stocking and the lining, so that the fold matches the edges of the fabric and the remainder of the ribbon/webbing hangs inside the stocking.
13.       Stitch the cuff and the stocking together, catching the ribbon/webbing into the seam.
14.       Fold up the cuff so that it lies flat, then topstitch the seam allowance to the stocking.
15.       Turn the cuff down.


Saturday, June 18, 2011

A productive morning


I started this morning's crafty endeavours with a follow-up trip to the Watsonia Wool Shop (no Kinderboy for company this time).  Scored some cotton which will find its way into baby wear, and also this blue yarn.  I've ditched the French Knitting idea, and instead drew inspriration from Kirsty's coat hangers to create this:


At last we're going public this weekend that we're due to have our third baby in December (that makes three December kids - thinking that I need to change my blog to 'December's mother' or something!!).  Each time I'm pregnant my fingers swell  I end up not being able to wear my rings, and I'm at that point already, so I've been trying to work out a safe way of having them with me (the Cyclist wore through the gold chain he was wearing his ring on when out on the bike, so I decided something a bit more durable was warranted). I like the texture and subtle colour variations yarn, and therefore the necklace, so I think this'll be my 'mode of transport' of choice for the rings for a while.  Wasn't quite game to sew them on just in case though...

Oh, and I followed Rebecca's tutorial, and basted the layers of my Christmas quilt together (minus a few pins here, as I went through all the new curvy safety pins I'd bought, all my ordinary straight ones, then had to resort to ordinary sewing pins for now):


Hope you're having a good crafty weekend!

Thursday, June 9, 2011

In my creative space today...


... I'm hoping to finish piecing the Christmas tablecloth quilt.  You'll be sick of seeing it I'm sure, so you'll be glad to know that I'm very nearly finished!  I fixed the mis-shapen squares and have been sewing them all together in strips.  I'm planning some pretty simple quilting, so hopefully I can knock the whole thing over in the next couple of weeks and shift back to the curtains I keep procrastinating about.


Check out other creative spaces over here.

Thursday, May 26, 2011

Two steps forward, one step back

I had hoped to have a finished Christmas tablecloth quilt-top to show off by now, but thanks to some over-zealous cutting I've managed to create some weirdly shaped blocks which are too small to fit in with the rest, so I spent some time yesterday removing the offending white and cutting more triangles (bigger this time).  The plan is to make squares that are over-sized, then trim them down to 8.5" to fit in to the spaces between my HST squares...


What are you up to today?  Check out more creative spaces over here while you're at it!

Thursday, May 5, 2011

Seeing stars

I've been working steadily on my Christmas tablecloth quilt, and the Schoolboy has been really supportive.


"Looks great mum".  Warm glowing feeling from me.


"How do you see the stars mum?".  Hmm... does this mean my layout needs work?


Today in my creative space I'm going to be trimming the last of the half square triangles I've made so far, laying them out and convincing myself that I'm not just seeing stars due to my recent lack of sleep!  Need to cut some more pieces to fill in the gaps, but hopefully by next week I'll have a quilt top to show.

Thursday, April 28, 2011

Just do it...

I know, I was going to 'snatch' time to stitch triangles over the next few days, and daydream about layouts...

... but there's no time like the present right? (particularly when the Kinderboy declares that he'd rather have a quiet day at home than go to playgroup).  So, I laid out my triangles as I'd pictured:


... hmm.  Not so much.  If this is going to be a tablecloth, it needs to look good (and Christmasy) from all angles.


... how about stars?


More stars?  I've settled on 13 of them, but I ran out of room on the bed.


And I found a use for those smaller triangles!

I'm off to colour in a layout diagram by hand (Excel doesn't really cope so well with all these triangles).  I need to trim down my squares too, as in my haste my sewing wasn't exactly straight.  Perfect excuse to sit and watch the Royal wedding tomorrow night perhaps?

An abundance of triangles

I think I'm about half way through the half-square triangles for my Christmas quilt/tablecloth.  There's 168 in all, and it feels like they go on forever because I really just want to get to the layout stage!


I have to say that I wish I'd planned things a little more carefully before I started though - I had a bit of this red and gold print, and rather than use it for only 6 triangles I thought I'd piece it with some other bits and make it stretch out.  Good theory, except that after I'd cut it I realised that I needed to piece it so that the seams ran parallel with the diagonal, not the right angled sides of the triangles, and now its too short to do that.  Have spent a fair amount of time kicking myself (hmmm I keep telling the Kinderboy that he's not allowed to kick people...), but haven't come up with the solution yet.


So, my creative space this week will be snatching time to stitch and press more triangles, and pondering the piecing of fabric whilst sitting at red lights.  What will you be up to?  Drop by Kootoyoo and let us see!

Tuesday, April 26, 2011

Easter and more


Don't you love my 'Easter' presents (given to me this morning)!  Designed by the Schoolboy, and manufactured by him and his dad.  Way more impressive than chocolate in my book.   Easter for me this year has been about contemplating not only the sacrifice that Jesus made in coming to earth, living and dying and the miracle of his resurrection, but also of the importance of family relationships, so the care and joy in the creation of my rings is doubly important.


At the other end of the Christian calendar, I also thought I'd show you the squares that I've cut to take part in the Chasing Cottons Quilting 101 class.  I figured that I needed to make a quilt for underneath the Christmas tree (we put it on a coffee table, and I need something festive to stop it from scratching the table and to replace the old sheet I usually use), so why not take part?  Well not so much an 'I figured' as a readymade excuse if I get questioned about why I'm starting yet another craft project!

I haven't cut a dozen squares of seven fabrics as instructed, because I had more of some fabrics than others and I didn't want to buy new stuff as using all my Christmas fabric scraps was also part of the point.  I do have the requisite 84 squares though, plus a few extras and some smaller half square triangles that were left over from a previous project.  Can't wait until tomorrow's tutorial to take the next step, then start fiddling with their layout (I've peaked at Rebecca's layout in her 'Design' tutorial, and I think I'm going to change it to cater for my uneven fabric choice).

Monday, December 20, 2010

Going dotty (part 1)


You might have noticed that my 'grand plan' includes a few dresses with spots, and that two of them absolutely must be finished this week or there'll be embarrassment around the Christmas tree come Saturday.  Well, I'm pleased to say that the first dress now totally finished.  I wanted a design that was a bit dressy, but not so much so that my nieces wouldn't get much wear out of them, so I've only lined the bodice, and rather than have a tulle frill peaking out from under the hem I've put a pink band on the bottom of the skirt.  So that's Miss 2 done, now I need to get onto Miss 5's matching dress.

Saturday, December 4, 2010

Kid-friendly Christmas garlands


Thought I'd share with you our family Christmas version of the paper garlands at art as life: what is to be is up to me.  My ideal was all white stars, but the boys were insistent about using their new Christmas stamp (I got both the stars and the stamp from Riot).  Result was so effective that the neighbour across the road came to see if we had new fairy lights!  Maybe one day I'll get my simple version, but in the meantime this's a very kid-friendly craft idea for Christmas. If you'd like another Christmas alternative / a 'how to', check out the snowflake version at maya-made.

Tuesday, November 23, 2010

Trying hard to resist temptation


I have wandering eyes.  I can't help it.  Every time I drive past a hard waste pile I just have to turn and look.  Who knows what treasures might be there, hidden amongst the discarded televisions and cushionless couches?  We were driving home on Sunday night when we passed a pile which looked like it held the contents of someone's lounge room - couch, television, tv cabinet, a picture frame and this little treasure perched on top.  I turned around and went back, my husband protesting, but I think it was worth the sighs and rolled eyes!  The only problem is that now my mind keeps on wandering to it and what it'd look like filled with something red and sparkly for Christmas.  Or maybe with something soft and tactile.  Hmmm need to focus: have to finish the trouser project and a fairy skirt this week, or my Christmas present plan will unravel.

Saturday, November 20, 2010

How many weeks is it until Christmas?

I've planned a very crafty Christmas.  You know - make as many of the presents as possible, that way they're unique, personal and hopefully you save a bit of cash along the way.  I've been doing a mental tally of the list though, and am getting concerned at this point.  Here it is in black and white:

  • Finish the Trouser Project bag (I cut out the pieces last night and in theory they're ready for embellishment, but I'm obsessing about one of the pockets that I've added and I think I'm going to redo it).
  • Make a dress each for my two younger nieces
  • Make 2-3 fairy skirts
  • Finish a photo album for my older son
It's a bit embarrassing that I've already culled the list, excluded the 'little' things like Christmas cards (soon to be relegated to next year again I'm afraid), and to say that I'd also like to finish the curtains that I'm making for our bedroom and make myself a dress, plus I've been looking at the trouser bag pattern and thinking that it'd be really cute to make little girl versions to go with the dresses (one side out of floral/spotted material and one plain, with a contrast binding)... [deep breath].  Hmm, and I need to work, look after the kids, etc..  Lucky my husband doesn't read this, or he'd be rolling his eyes!  I plan to finish the trouser bag and one fairy skirt this week, then take it "one week at a time" - wish me luck!

LinkWithin

Related Posts Plugin for WordPress, Blogger...