Showing posts with label clothing. Show all posts

Friday, February 14, 2014

Library love

I love browsing the magazines at my local library.  I have to confess that I rarely make it to the 'real' shelves - I get quick snatches of time whilst supervising kids or on my way out to lunch (I'm lucky enough to work next door to my local library), so the magazine section it is.


The Burda magazine pigeon hole is one of my first points of call.  So often I borrow them with good intention of tracing off patterns I like, but usually they get renewed the maximum of three times before being sent back unused.  I'm proud to say that that's not the case for the 6/2013 edition.  Granted, I've already renewed it once, but no only have I traced off the patterns for Views 137 and 138, but I've actually finished a top based on them.  What's even more impressive is that I love it!  So often I take copious amounts of time to finish clothes for myself, only to find that they're not quite right - the fit's not great, or my fabric choice is wrong, or the cut isn't really my style.  This time though, the dark navy crepe from my stash is not only right down my alley, but it has just the right weight and drape for the pattern.

I've used the length from View 137, but the neckline of View 138.  Its a size 46, which I find horrific, but the fit is beautiful.  There are darts in the front and back of the upper section, but just the back of the lower section, and a side zipper that extends to the integrated sleeves.  Beautifully comfortable, but fitted at the same time.

Up next I'm planning a shorter length A-line skirt in the rest of the same fabric, plus the dress length (with a slightly narrower neckline) in a some more fabric from the stash.  I'd love a pair of narrow-leg trousers to go with the top.  Trying not to get too far ahead of myself though!

Its a curriculum day today, so amongst adjudicating between the kids and doing stuff with them, I'm going to loiter over here and check out what the crew have been up to.


Thursday, May 2, 2013

Upsized Clara


Have you seen the Clara dress pattern?  I fell in love with it before my daughter was born and tried to buy it.  My bank's security system wouldn't let the transaction through - when I contacted Isager because my order didn't seem to be being processed, they advised that this isn't uncommon for Australian customers.  Apparently the 'falcon' thinks that you're trying to shop in person in the US when it knows you were only down the street using your card 20 minutes ago, and it rejects the transaction.  Over a year went by, and I tried again (this time with a card from a smaller bank), and was successful.  The problem is, that the pattern is sized for a chest circumference of up to 20", and that's my daugher's current measurement.  I didn't want to go to the effort of making the dress only to have her grow out of it before winter is over.

Well, after many calculations and much trial and error, I've finally finished my 18-24 month size of the pattern.  I managed to make it out of the two skeins (500m) of wool in the kit, with just 2m to spare (most of the calculations were me working out how many stitches I could expect to knit out of each gram of yarn, and therefore how long I could afford to make the skirt!).

In summary I:
  • Cast on 260 sts (after I had nearly finished I read other posts on Ravelry, and yes it would have been easier to use 261stitches, and decrease one stitch in the first round of the pattern)
  • Then followed the pattern, knitting to a length of 29 cm / 11.5 inches
  • Split into rows at the start of the moss band beneath the bodice, 'splicing' it to create a lapped opening.  
  • Included a moss stitch button band on both ends of the row as I was knitting from this point forward, adjusting the pattern accordingly, and evenly spacing three buttonholes.  In hindsight I would have put the bottom buttonhole in the horizontal moss band - it pulls a little.
  • Knitted the 'set sleeve' row as follows: Moss 5, k26 sts, place next 10 sts on holder, CO 65 sts, k54 sts, place next 10 sts on holder, CO 65 sts, k25 sts, moss 5 (245 sts on needle). 
  • Inserted one additional WS row after Rnd 1, three additional rows (with only one k2tog tbl in each repeat for right-side rows - ie. no decreasing over the length of the row) after 'Rnd 14', and two each after Row 1, Row 3 and Row 5.
  • Omitted Row 9 and Row 10 (giving a total of 32 rows from the top of the moss band to the bottom of the neckband).
  • Knitted up 77 stitches for each sleeve band.  Due to my yarn restrictions I knitted eight rows on each.


No, she doesn't usually get to play with sticks!

I'm joining up over here, and will be checking out what other people are up to working shortly.
Joined up here too.

Friday, November 30, 2012

Short orders

In celebration of National Recycling Week (or because my 'revamp/repair' box was overflowing), last week I whipped up a couple of T-shirts for the boys from three that the Cyclist had discarded plus a bit of my ever-present red cotton.  I say 'whipped up' as if it were no trouble at all, but truth be known that this time last year I wouldn't have even attempted it.  Its amazing what 12 months, a twin needle and an overlocker will do for you!


I used the Headphones/Globe Kids pattern from Ottobre 3/2012, but rounded the neck.  Based on my experience with this shirt, I checked the pattern pieces against some of our existing T-shirts, and ended up sewing a size 134 for both boys, even though they measure a size or two smaller.


The only complaint?  The Cyclist wished that I'd slimmed the shirts down for him instead.

To round it out I made this little 'Sweet Dress' for the youngest.  Using broderie anglaise made it even quicker to sew, and I'm proud that I managed to go from the fabric store to finished product in less than two days.  Considering that most of my stash takes a decade or so to see the light of day that has to be some sort of record!


Instead of wholly encasing the neck elastic I put two buttonholes through the dress front before sewing the casing, and threaded through elastic with some ribbon on each end.  Hopefully that way it'll grow from a dress this summer to a top next year.  I also left off the armhole elastic.


I've been blessed with an unexpected free hour or so, so I'm going to amble over here and here and link up and check out what others have been up to.  Thanks for stopping by!
Monday, October 29, 2012

Shirt for the Schoolboy

I've finally finished the shirt that I was going to make for the Schoolboy during Kids Clothing Week.  I've been plugging away at it bit by bit, and am really happy with the result:


I took a long time lining the pattern pieces up on the fabric for this shirt, and I love the 'invisible' pocket (and his amazement when he found it),


am really proud of the way the back and the yoke line up,


but not sure why it is that I cut the right sleeve out upside down (or why I didn't realise exactly what was wrong with it until the shirt was finished)!

All fabric and button choices were the Schoolboy's.

The pattern is 'Apple' from the Summer 2010 Ottobre magazine, altered to include some snippets of red gingham.  This's the first of the kids patterns I've sewed from the magazines, and I have to say it seems quite slim fitting.  My boys are very different builds (same chest and waist measurements, but 10-12 cm difference in height), and the Schoolboy is both slender and likes his shirts slim-fitting.  I used a size 128 to match his height even though his chest was smaller than the size chart, and am glad I did - a narrower fitting may not have been big enough.  As it is he's slightly miffed that I'm going to make his brother's shirt the same size!

Monday, October 15, 2012

KCWC: Leila & Ben's Sweet Dress #2

Hmmm.  Kids clothing week was supposed to be about the boys.  Can't really see either of them wearing this little dress:

The youngest, however, is rather taken with it, and Melbourne may even warm up enough for me to put her into short sleeves sometime in the next day or so.  KCWC is officially over, but I'm going to keep going at it (half-paced as I am, my counter is currently up to 3:41:07.9), and boys shirts are next on my list.  I promise boys.

Here's the details for the spotty dress:

Pattern:  Leila & Ben's Sweet Little Dress 
Size:      12 months

Modifications:  
As with the previous version, I used my overlocker for all of the seams.  I also straightened the hem, because a curved bottom just looked strange with all those dots.

I'm thinking of adding a little embellishment on one of the dots, but more of that later (I still need to be convinced that she won't eat what I have in mind!)

Materials:  
Poly-cotton from my stash, left over from these dresses.

Lessons/Comments:  
I learnt from my mistake last time round, and tried it on her before cutting and stitching the elastic.

Wednesday, September 12, 2012

A-line #2 (Playing Fabric Chicken)

I'm not sure if its evident in what I make or not, but I usually wear solid colours.  I'm not really into patterns or text on clothing.  Not sure why.  It surprised me then, that last year I was attracted enough to some large floral fabric to order it from the States with no particular end-product in mind.  I wear a lot of red and black, and also white, and with the days getting warmer over the last few weeks, I decided to break out and turn it into another A-line skirt.  There was only a yard (90cm) of the fabric, and the pattern calls for 2m, so figuring out how to cut it out and the length of the finished product took at least as long as the actual construction process.  Here's my finished product:


The pockets are both for practicality, and also allowed me to overlap the pieces more on the fabric, meaning that I could keep this length without adding a contrast bottom at the hem.  They're from the Aztec skirt in the Autumn/Winter 2012 Ottobre Design magazine.

To save fabric I also needed to ignore the direction of the print!  The back it cut upside down, and as you can see I haven't made any attempt to match the pattern.  I also cut separate 5.5cm wide hem facings for the bottom (cut at 90 degrees to the rest of the skirt) to maximise the length of the finished product.


Here's the complete details:

Pattern:  Nicole Mallalieu's A-line skirt
Size:      12 

Modifications:  
  • I shortened the pattern by 23cm, and cut separate hem facings.  This allowed me to make a skirt that is around 20cm shorter than the pattern from my miniscule amount of fabric. 
  • As with the Butterfly Skirt, I trimmed the yoke by 1" at the waist.
  • I cut the waistband from a contrast fabric (again, saving my floral fabric).  I'm not sure if I like the look of it or not, but the reality is that most of the time my top will hide it, as you can see in this dodgy self-taken shot.
  • I added pockets, using white for the underpocket piece, so that the red wouldn't show through the floral fabric:
I used a 5mm seam, and then under-sewed the allowance to the white fabric.

I then attached the red pocket piece to this (pinning across the top and the pocket opening and then sewing all round the outside of the pocket):

From there I treated the whole as if it were a single bit of material, and made up the skirt as usual.

Materials:  
90cm of 'Artful Home' quilting cotton by Heather Mulder Peterson; and
'Jester' red cotton from the stash, but originally from Spotlight (I think I should have bought a bolt of this, I love the colour so much)

Lessons/Comments:  
  • I didn't use the blind hemming foot to stitch in the ditch this time, and wished that I had.  I also hand-hemmed it, and found that I would have been just as happy with the finished product if I had machine hemmed it like last time.
  • Making this skirt reminded me of this post over at Made by Rae.  She lists the length of material she buys if she doesn't have a project in mind.  Also, LiEr gives a good rule of thumb over here.

Monday, August 27, 2012

Love the A-line

Have you checked out Nicole Mallalieu's A-line skirt pattern yet?  I've had a hankering for a new skirt, 'just' the fabric in my stash, and amazingly no A-line skirt pattern in my collection.  I bought Nicole's pattern, and am so glad I did.  I made this skirt yesterday while the Cyclist and the boys were in Bendigo for the day, and was waxing lyrical about it by the time they got home.

The pattern comes together really well, fits fantastically (she includes an instruction of how to modify the pattern if your waist is a size larger than your hips), and definitely doesn't look home made.  Its also very adaptable.  I've cut out a second version which I'll show off as soon as I've got it finished to show you what I mean.

Here's the details of my 'butterfly skirt':

Pattern:  Nicole Mallalieu's A-line skirt
Size:      12 

Modifications:  

  • Trimmed the yoke by 1" at the waist to make this measurement equivalent to a size 16. 
  • Added a panel of butterfly print fabric (underlined with a white poly-cotton) to the right side of the front.  Nicole suggests that for denim you can applique the panel over the top of the base fabric.  I found that the combined weight of the print and the poly-cotton was similar to the denim, so I pieced the front instead.
  • Added a side pocket on the right side.

Butterflies in my pocket!
Materials:  
Black stretch denim and a remnant of  'Illuminating Spring' (by Stephanie Marrot for Wilmington Prints) from the stash

Lessons/Comments:  

  • Nicole's directions really are fantastic.  They gave me the nudge I need to try blind hemming for the first time.  I also used the same foot to help me edge stitch and stitch in the ditch more accurately.
  • My feature panel's 1/4 of the width of the front piece, which's probably a little on the small side.  
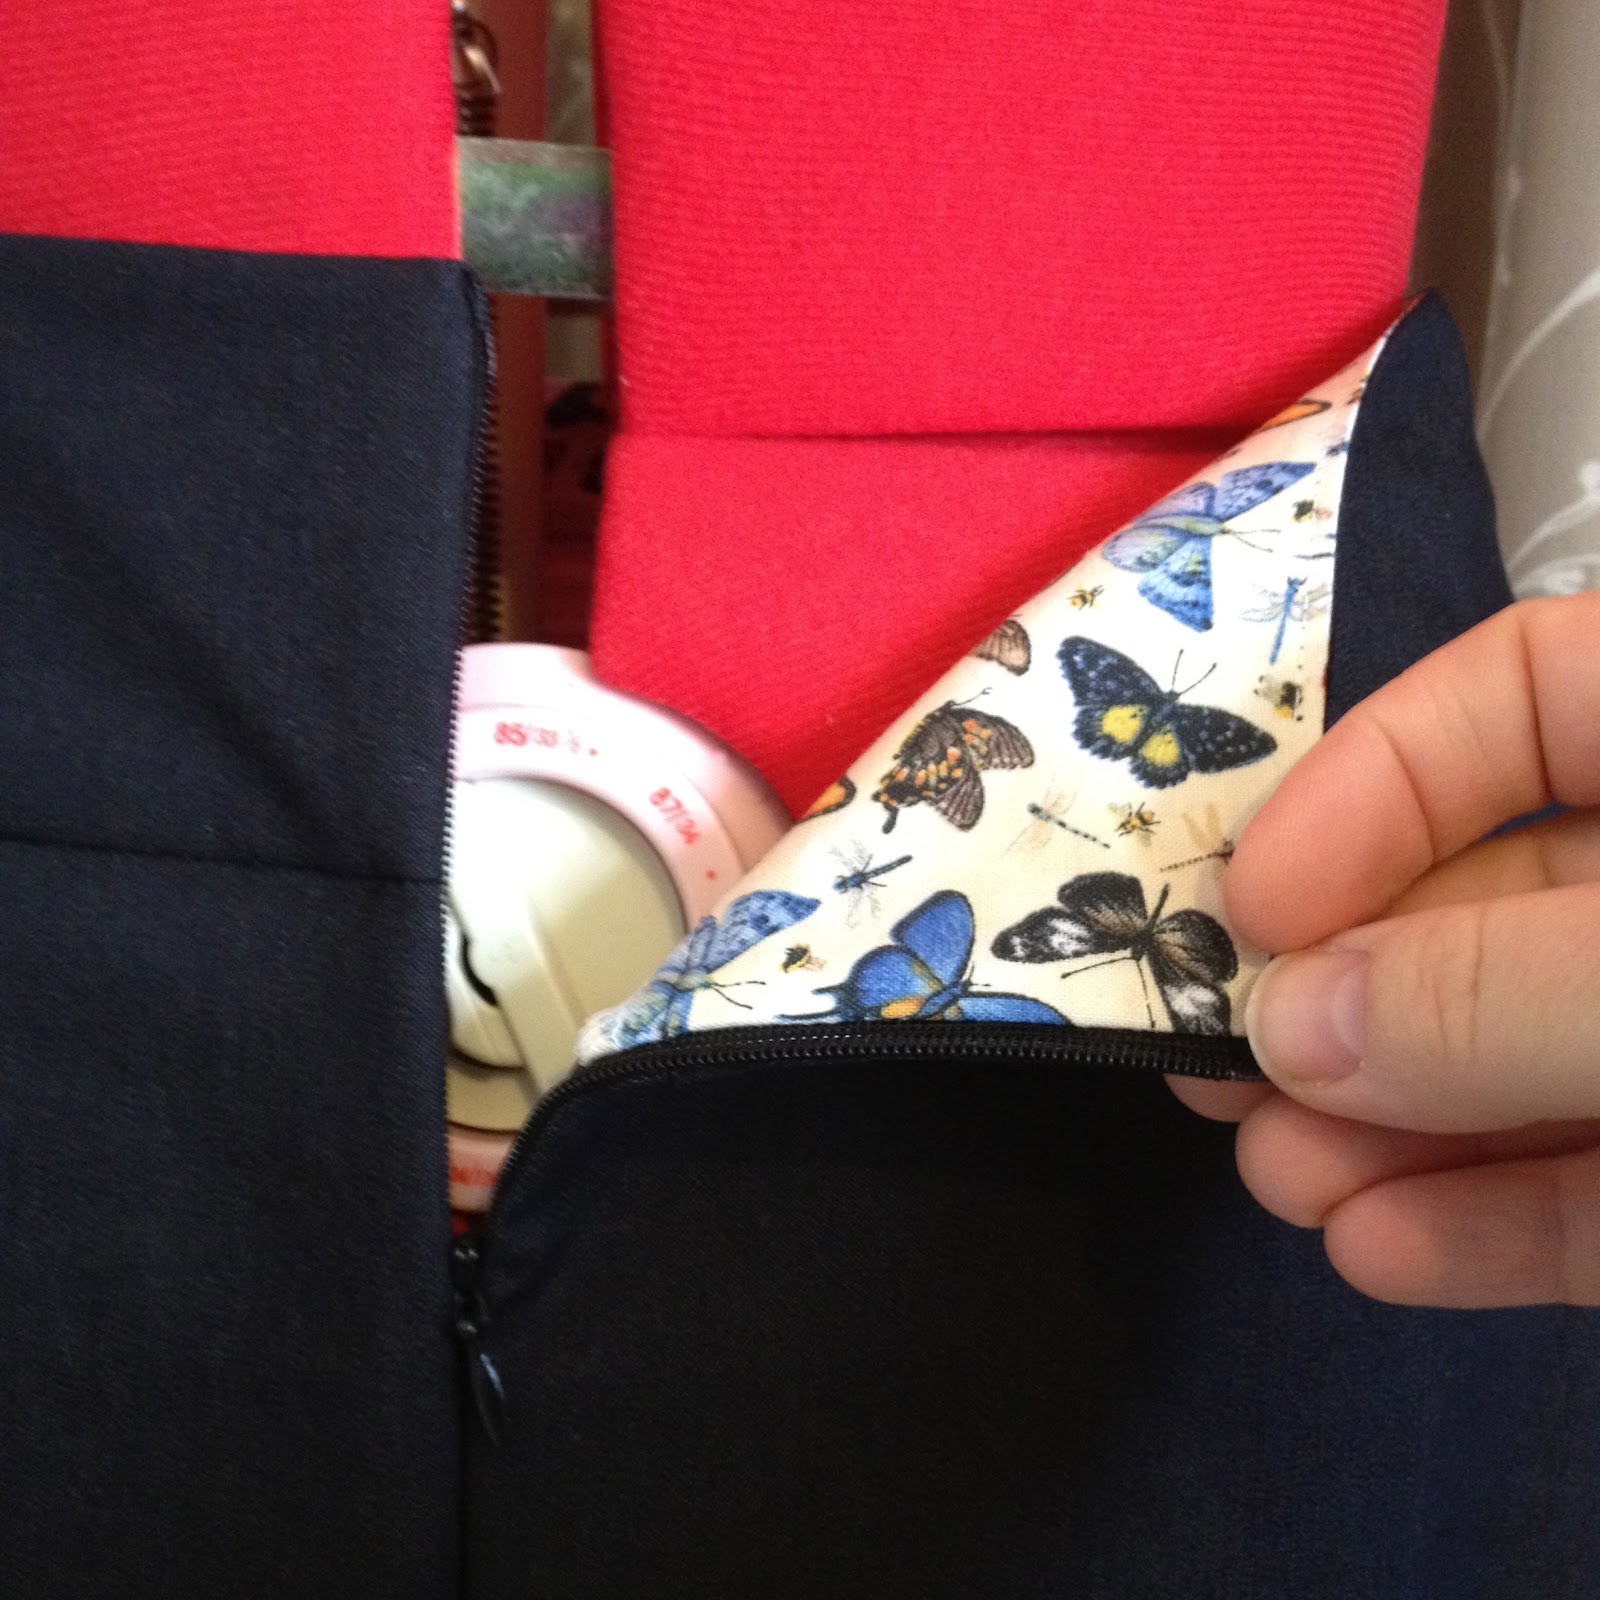
  • This was my second attempt at putting in an invisible zipper, and the first time with my new invisible zip foot.  Her instructions are really good, and I was thrilled with the results yesterday.  Looking at the photos, my job's not perfect, but I suspect that no one else will notice.

  • I love this skirt so much that today I was tempted to tuck my top in to show it off, something that hasn't happened for a long time (probably since the waist grew to be two sizes larger than the hips!)
More butterflies on the inside


Thursday, June 21, 2012

Cosy toes

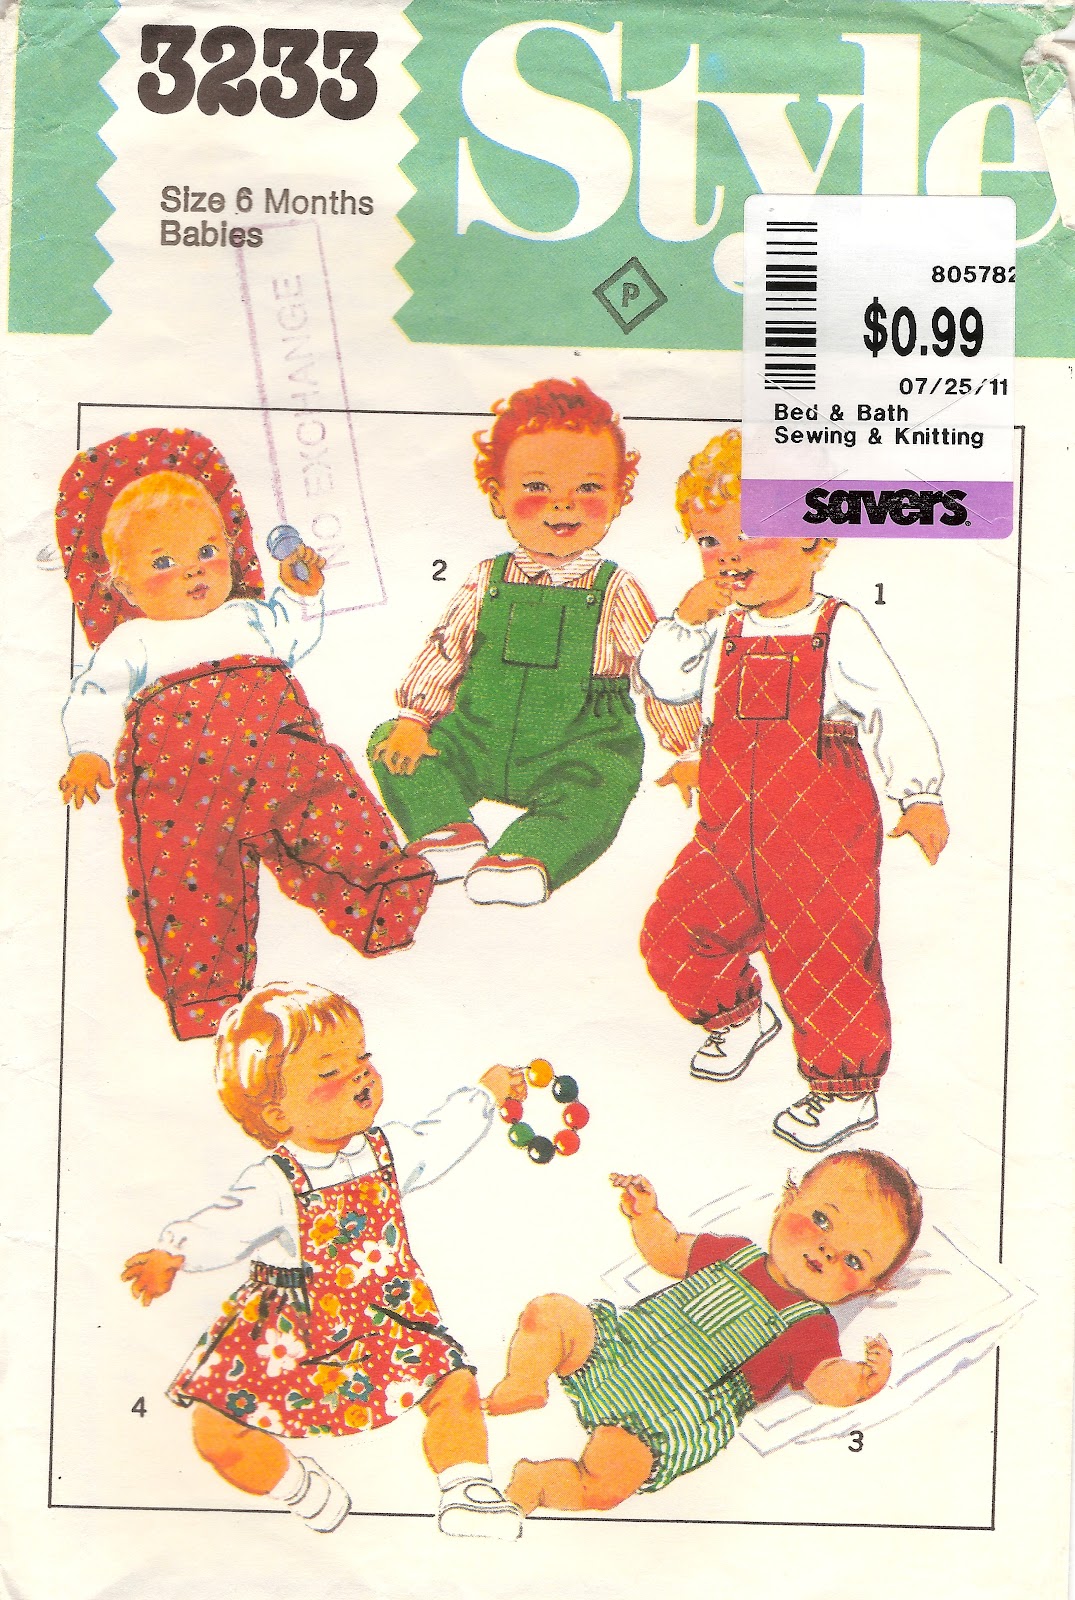
I bought a number of patterns from Savers last winter.  My pattern drawer's overflowing (well, actually its a drawer and a box now), and I was determined to only buy the patterns if I was going to use them.  I failed on the others - they were all maternity patterns, and have made it to the op shop without me so much as checking that all the pieces were there.  This pattern's my chance to redeem myself.  It's for six month old babies, and as the Newbie is now six months (and in need of a new on-line moniker), its now or never!


I bought the pattern for the 'cosy toes' view (top left).  From where I stand it looks fantastic - no more lost socks/booties on the way to school, no more blankets falling off the bottom of the stroller when out for walks, etc.  I pulled it out on the weekend, and found two bonuses:
  • The fact that its an old single-size pattern meant I could use it as-is:  no tracing off the size I was after.  This is one of my least-favourite things about sewing, as it seems like such a long process to go through before getting down to the 'real thing' of cutting and sewing the fabric.
  • The cosy toes pattern isn't actually designed for a six month old, its a 'one size fits all' through to 18 months.  Brilliant.  I've tricked myself into using the pattern, but I'll get to use the product this winter and next.  
I finished it at lunchtime, and from the first trial I guess she's as excited as I am!

I've made it with some polka-dot cotton I bought from Darn Cheap Fabrics a couple of weeks ago, lined with offcuts of bamboo quilt wadding and some solid pink and a tiny bit of floral that's been in my stash for an embarrassingly long time.  I did a butterfly applique on the back, mainly to hold the layers together (the seams do the job elsewhere).  Not being one to reinvent the wheel, the butterfly came from this download.  Now I just need it to stop raining so we can go for a walk and try it out.


Friday, June 8, 2012

Quick update on a quick fix

Here's my quick crafty fix for this week:


Cute-as-a-button booties from this book using fabric from my stash.  I'm planning another pair, and when I do I'll take photos of  how I applied the soles (Anna Maria's instructions involved too many potential burnt fingers for my liking!).  

The Newbie loves them - I tried them on her and her face said 'wow look mum - there are butterflies on my feet!' all in one wondrous grin.  Didn't stop her from kicking them off within 30 seconds though.  Perhaps I should have sewed name tags on the bottom!

Sunday, April 1, 2012

Knitted baby cloche

I have to confess to spending way too much time gazing at Pinterest.  A while ago I pinned this lovely hat:

Source: pickles.no via Jackie on Pinterest


You can download the pattern for the hat and matching cardigan from the link (the 3-6 month size is free, and you can pay for 1yo and 2yo sizes).  I was a bit confused about the stated tension when compared with the size of the hat and the number of stitches, and wanted to knit it on straight needles using 8 ply (DK yarn if you're in the US), so I modified it accordingly.

Here's my version, which should fit a 3-6 month old (its a bit roomy on my 3.5 month old Newbie's largish head).  I used less than one ball from my stash of leftovers - I think it might be Patons Alpaca Classique from the late 1980s:


Using 4mm needles, cast on 89 stitches

Knit 7 rows, then Purl 1 row (this forms the basic stripe pattern, I've separated the pattern below into this grouping to make it easier to read)

Knit 7 rows
Purl 1 row

Knit 5 rows
Knit 45 stitches, then wrap your wool around the knitting between the needles about 10 times.  You should wrap it firmly enough to gather up the knitting you've already done (see photographs of finished hat).  Knit to the end of the row.
Knit 1 row
Purl 1 row

Knit 7 rows
P5, *P2tog, P5, repeat from * to end of row (77 sts)

Knit 7 rows
P4, *P2tog, P4, repeat from * to last stitch, P1 (65 sts)

Knit 4 rows
K3, *K2tog, K3, repeat from * to last two stitches, K2tog (52 sts)
Knit 2 rows
Purl 1 row

K2, *K2tog, K2, repeat from * to last two stitches, K2tog (39 sts)
Knit 3 rows
K1, *K2 tog, repeat from * to end (20 sts)
Knit 2 rows
Purl 1 row

K2 rows
*K2tog, repeat from * to end,  (10 sts)
Knit 1 row
*K2tog, repeat from * to end,  (5 sts)
Fasten off

Sew up centre back seam.

Thursday, March 29, 2012

The definition of madness

They say that the definition of madness is repeating the same actions and expecting different results.  I'm telling myself that I'm not quite at that point, as I've made some minor differences between the two versions I've completed of View C of the Simplicity 2245 / Lisette Portfolio top in the last 2-3 weeks.  Here they are:


After making this first one I decided that my second version should be longer, and the plan was to add some sort of sash/belt to give the top some shape.  Its rather like wearing a sack!

The problem is, that now that I've actually made the second one I'm not sure that the sash idea will look right either.  Hmmm.  The tops are really comfortable, and the shape allows me to feed the Newbie with no dramas.  I feel like I'm wearing hospital scrubs though.

The verdict?  This year's about trying new things from a sewing point of view, and I'm going to use this exercise as a reminder to myself to consider the shape of my body more when choosing patterns.  Having said that I will try this pattern again, but I'll use a fabric that drapes more and wait until I finish breastfeeding.  The style might suit my body shape more then, and I can make the dress version (with some luck the added length will mean more weight in the fabric to increase the amount of drape).

On another note, I found when I got this pattern home that it seemed to be sized to fit the measurements on the back, which I have to say is the first time I've found this to be true of a women's pattern!  As a result, I needed to make it larger than printed (perhaps that should have set off a red light in my head?!?).  If you're thinking of buying it this's worth bearing in mind when choosing which size pattern to pick up.

As further evidence of my insanity, I'm sharing my failure over here.  Of course, I'll also be checking out what other people have been up to.

Thursday, March 1, 2012

Nothing new under the sun


My creative space this week is a little like Sesame Street.  Instead of being 'brought to you by the letter "J" and the number "3"' though, I'm bringing you my second Girlify post 'brought to you by the blog "Sew Love It" and the blog "Make-it Love-it".


This body suit was too wide and short for my Newbie.  Not to mention that the train would've had people confused about her gender.  This year's summer in Melbourne has been variable to say the least (winter temperatures, rain and wind today, but too hot and humid for my liking just a few days ago).  A light cardi would be a good addition to her wardrobe, so I got brave and cut the bottom off the bodysuit, turning it into a double-breasted cardigan.


I then set about embellishing it and hiding the train.  In doing so I used:

  • The ruffle and gathering ideas from her red ruffle pants to create a ruffle that extends from the top press-stud inside, around the neckline and the bottom edge, back to the bottom press-stud at the front.  I used 1.5" wide fabric strips, with contrast thread for the zig-zag on the edges, and gathered it down the centre.
  • The flower ideas I had for the Girlfy pyjamas, but I used eight narrower petals of two separate colours, stitching them together in pairs.
  • This idea for covering a button for the centre of the flower
It took me about a week to complete due to the craziness of life in our place at the moment, but the actual sewing time was pretty short.  If you've got a wrap body suit that isn't quite right I'd highly recommend taking the scissors to it!!

Tuesday, February 14, 2012

Pillowcase Dress #2: Simplicity 4243 (yet again)

I've completed my second pillowcase dress (although I realise now that I should have ironed it before taking photos!), and am hoping that I'm meeting my aims despite the fact that I've used the same pattern as I did for Dress 1!  It had been my plan to invert the pleats at least, only I didn't think through the implications of that around the neckline, and it wouldn't work (I am planning one final version of this pattern, with the pleats on the outside, and I'll show you what I mean and how to adjust the pattern as part of that post).  This is View E in Size S, and should fit the Newbie soonish.

I saved time and made a floral version in Size M at the same time - hopefully it'll fit next summer.


I'm loving the decorations - the little white flowers came from my Grandma's stash, and I suspect they date from when my sister and I were little.  The buttons on the floral dress have been in my sewing kit since high school, so it also feels good to give them a nice home!


Monday, January 16, 2012

Pillowcase dress 1: Simplicity 4243

I've finished my first pillowcase 'dress' (actually, its tunic length on the Newbie, who's a month old today!).  I love the finished product:


Here's the details:

Pattern:  View D of Simplicity 4243
Size:      XS

Modifications:  
Added sleeves as per Views A and B, and added a button placket with two buttons at the back, rather than the recommended zipper

Materials:  
Pillowslip (including lace from base), buttons and bias binding from the stash

Lessons/Comments:  
Read the instructions rather than charging ahead!  The construction process would have been a lot easier if I had have inserted the sleeves before sewing the side seams (as detailed in the instructions) rather than after.  I found the bias facing for the neck difficult to use due to the reasonably tight curve on the neckline - will try a different approach next time I think.

After more inspiration?  I'm linking up here, here and here.

Sunday, January 15, 2012

Pillowcases 6 ways

I have a collection of 6 'nearly-made' pillowcases that have been sitting in my cupboard for at least 15 years.  I'm not sure if they're a relic of my mother's Artex fad of the 1970s, or an unstarted embroidery project that I inherited from my Grandma*, but I've never really been sure what to do with them.  They're a tubular cotton fabric, and because there's no edge to tuck around a pillow I've never been convinced that they would actually work as pillowcases.  Each has lace and a printed flower design at one end (two of one design, four of another), and a raw edge at the other.  The lace edge isn't exactly straight on all of them, as you can see on the pillowcase on the right:


I rediscovered the pillowcases when I moved the office/craft space last year, and combined with the tutorials I keep coming across for 'pillowcase' dresses, set myself a challenge.

I'm starting today, so here's my self-imposed rules:

  • I need to make at least six garments for the Newbie from the pillowcases.  The plan is to make dresses, but a top or two is acceptable.
  • I can 'borrow' fabric from one pillowcase to complete a garment made from another (eg. I plan that one of the dresses would include two of the flower prints, whilst another won't have any).
  • The dresses need to be in a range of sizes.
  • I need to make them look as different from one another as possible.
  • I should avoid the 'standard' pillowcase dress design.
  • I can use additional (coloured) fabric for highlights, but each garment needs to be predominantly made from a pillowcase.
  • I need to use as much of the pillowcases as possible.


* Just found the painting instructions - a remnant of the 70s they are (just in case the mystery was keeping you awake at night!).

Monday, January 2, 2012

Achieving a long-held ambition

Happy New Year!

We were in bed by the time the official fireworks started, but had a great time earlier celebrating the Schoolboy turning 7, and at our traditional fancy dress party ('E' themed this year, although we already have more suggestions for 'F' than anyone had for 'E'!).  I hope that you had a great night, but more importantly that this year has dawned with fresh energy, hope and optimism!  For us, I loved the fact that New Years' Day was a Sunday, and the Cyclist and I got to start it at a reasonably quiet and reflective Church service focused around God's grace - for me the best New Years' periods are those where I take time out to reflect on His character.

No resolutions around here as yet, and no crafty ambitions in writing, although there's plenty swirling around my head and one long-awaited project underway.  In the meantime, I've been meaning to publish this post, which I wrote a couple of months back, before the Newbie was born.  She won't fit into it for a while yet, but I keep wanting to get it out and have a look at it...


Way back in the dim dark ages when I was a teenager I saw a little smocked dress that a girl a bit older than me had made for the baby of a mutual friend.  It seemed like such a great gift that I decided then and there that I would learn to smock one day.  I've held the ambition in the back of my mind, but have been a bit intimidated by the complicated and time consuming nature of the process.  I should say, "what I thought" was a complicated and time consuming process, because back in October I tried it, and it wasn't as bad as all that!

Here's my first attempt:


Another case of me 'watering down' the pink content of the Newbie's clothing.  You might recognise the fabric - its yet more of that check material I used on the mother and son PJ pants.  Its a tiny check, and I ran gathering lines every 3rd check to get the right sort of spacing.  Here's what I did/discovered:
  • Smocking isn't really as intimidating as all that.  Its actually a reasonably quick project in front of the Box (this lot took me 3-4 days of feet-up time during my 3rd trimester)
  • You do need to be careful about that first patterned row though - I missed a couple of pleats and missed a stitch in another place, all of which added up to me deciding to alter and reduce the smocking I had planned because I didn't want to perpetuate the mistakes and make them more obvious.
  • If (when) I do it again, I'll leave the ends of the stabilisation row and first row of the pattern free until I've worked the second row, just to make sure that I haven't made mistakes - that'll make them easier to unpick.
  • I used Simplicity 7017 again, but widened the front so that it was around 2.5 times with width of the band at the top.  This seemed to be a good amount of gathering for the smocking.  I left the back as per the pattern, but gathered the top rather than pleating it.
  • To get instructions for smocking my main reference was this craft book that I've had on the shelf since before the original smocking encounter (It was printed in 1983, so I guess that means I've been referring back to it periodically for various projects for nearly 30 years!):

  • I also had bought a couple of smocking magazines (who knew that such publications existed?) from the newsagent - they had some great stitch ideas but were pretty light on for instruction on the actual 'how to smock' component.
PS.  Have just been 'surfing' Pinterest, and came across this tutorial, which might be helpful if you're planning to try some smocking yourself (I'm going to be referring back to it for my next project...).

Saturday, December 24, 2011

Succumbing to pink

I've a couple of posts that I prepared a month or so back, but didn't want to post until the arrival of the Newbie.  This's the first:


I'm not into pink.  Never have been.  Had a pink/mauve bedroom under sufferance as a girl and have largely avoided it ever since.

However anti-pink I am though, being faced with the prospect of a little girl in the family I've softened my view somewhat.  Prior to the little one's arrival I was shopping and crafting with a view to watering down the inevitable pink, as even I have to concede that I'm not going to be able to get away with dressing a baby girl solely in our usual red/white/blue theme.  So I've branched out a little.  Here's the knitting I finished back in October but couldn't show you until now:


Wednesday, November 2, 2011

More freezer paper

As promised I've been doing some more freezer paper stencilling - a Star Wars logo at the request of the Schoolboy, who loves his '86' tee so much he's determined to show it off to all rather than save it as a pyjama top.


This time round I actually did three coats of paint (a little thickly I think - perhaps thinner coats wouldn't have bled so much?).  The colour does look slightly more solid than my previous efforts, but isn't darker - when buying fabric paint in the future I'll be tempted to go a shade darker than what I'm looking for to account for the fact that it does seem to dry lighter.

I have another (actually, another 5!) project on the go, but for now I'm heading over here to look at what other people have been up to.
Friday, October 28, 2011

First-time on a Friday

I've been wanting to try some screen printing for a while now, and have read lots of blog references to simple printing using freezer paper.  I'd never heard of freezer paper before, and kept forgetting to check if they had it at the supermarket.  I finally got around to asking at Spotlight last week though, and at less than $2 a metre I figured that I should 'just do it'.

Today I quit procrastinating and tried it on some tops I bought as pyjama tops for the boys.  I used my Creative Memories cutting system to cut some ovals, then traced numbers (up there for creativity I know!  I'm so original that the numbers even correspond to the size of the tops they're on - '68' = '6-8').  Not perfect, and certainly not the height of originality, but I'm pretty happy with the result.  Next on the agenda is a long-sleeved version for the schoolboy with a 'Star Wars' logo, and maybe some fabric for a cushion.


I found this tutorial to be quite thorough, although I only left the paint to dry for about 3 hours.  My paint also said to iron it for 5 minutes to set it.

I used Setacolor Opaque paint in Indigo, and with a single coat found that it was lighter than I expected.  A second coat may have darkened it up more perhaps (I'll let you know after round two!).  I bought the paper from Spotlight (less than $2 a metre), but should have also checked the supermarket I guess.

LinkWithin

Related Posts Plugin for WordPress, Blogger...