Did you know that this week is the inaugural National Op Shop Week here in Australia?
What's it all about? Well, apparently whilst we're shopping at op shops more we're not remembering to re-stock them with our own unwanted clothes. Being school holidays, I thought it was about time that I added to the boxes I started filling with stuff a couple of weeks ago. The dilemma now though is should I purge straight away and get them out of the house, or should I wait and donate them to the school fete?
For more details you can check out Peppermint Magazine (where I first heard of the Week), and the Do Something Near You website.
Showing posts with label fantastic finds. Show all posts
Showing posts with label fantastic finds. Show all posts
Tuesday, September 25, 2012

Wednesday, August 8, 2012
In praise of peach boxes
Last week Kirsty put out the call to people on the My Creative Space page to blog about their top tip for staying creative. I've been thinking about it, and I think that I've come up with my answer (more of that tomorrow), but in doing so I was reminded about the importance of time management in the whole creative endeavour. I've spent way too much time over the years looking for things that I know that I have, and earlier on this year I adapted a storage idea I've been using for the kids toys for years: peach box drawers.
They're strong.
They're a uniform size.
They're stackable.
They have holes you can use as finger pulls.
(If you paint them) they look great.
Things look instantly neater when they're put in them.
They last better than plastic.
When you're done with them you can recycle them.
They're free.
Brilliant!
Here's how I use most of our collection at the moment:

(The one draw-back that I found was that I can't quite get two across into my craft cupboard, hence the mess to the right, but more of that tomorrow too.)

What's your top creative tip? I'm planning to join up tomorrow and have my say. I'll be looking forward to seeing what others come up with too.
Thursday, June 28, 2012
My creative space
My Creative Space today should be about stripping back this roadside find:

Spotted on a quick trip down the street, and only picked up because I promised the Cyclist that I wouldn't leave it in the garage, that it wouldn't be a 'burden' on me [his code for unfinished project I suspect], etc.
I promised, but in fact the first time it's left the garage since the weekend is when I took this photo this morning. I know it will be brilliant for little Miss A (the little chair we had for the boys was destroyed by my big boy and the bigger one across the road, so who am I to pass up a free-but-in-need-of-work replacement?), but in the meantime I've been distracted by turning this pile of fluffiness into a fairy skirt for her (photos and how-to to come):

What are you up to in your creative space today? I'm off to Village Voices to see!

Spotted on a quick trip down the street, and only picked up because I promised the Cyclist that I wouldn't leave it in the garage, that it wouldn't be a 'burden' on me [his code for unfinished project I suspect], etc.
I promised, but in fact the first time it's left the garage since the weekend is when I took this photo this morning. I know it will be brilliant for little Miss A (the little chair we had for the boys was destroyed by my big boy and the bigger one across the road, so who am I to pass up a free-but-in-need-of-work replacement?), but in the meantime I've been distracted by turning this pile of fluffiness into a fairy skirt for her (photos and how-to to come):

What are you up to in your creative space today? I'm off to Village Voices to see!
Thursday, June 21, 2012
Cosy toes

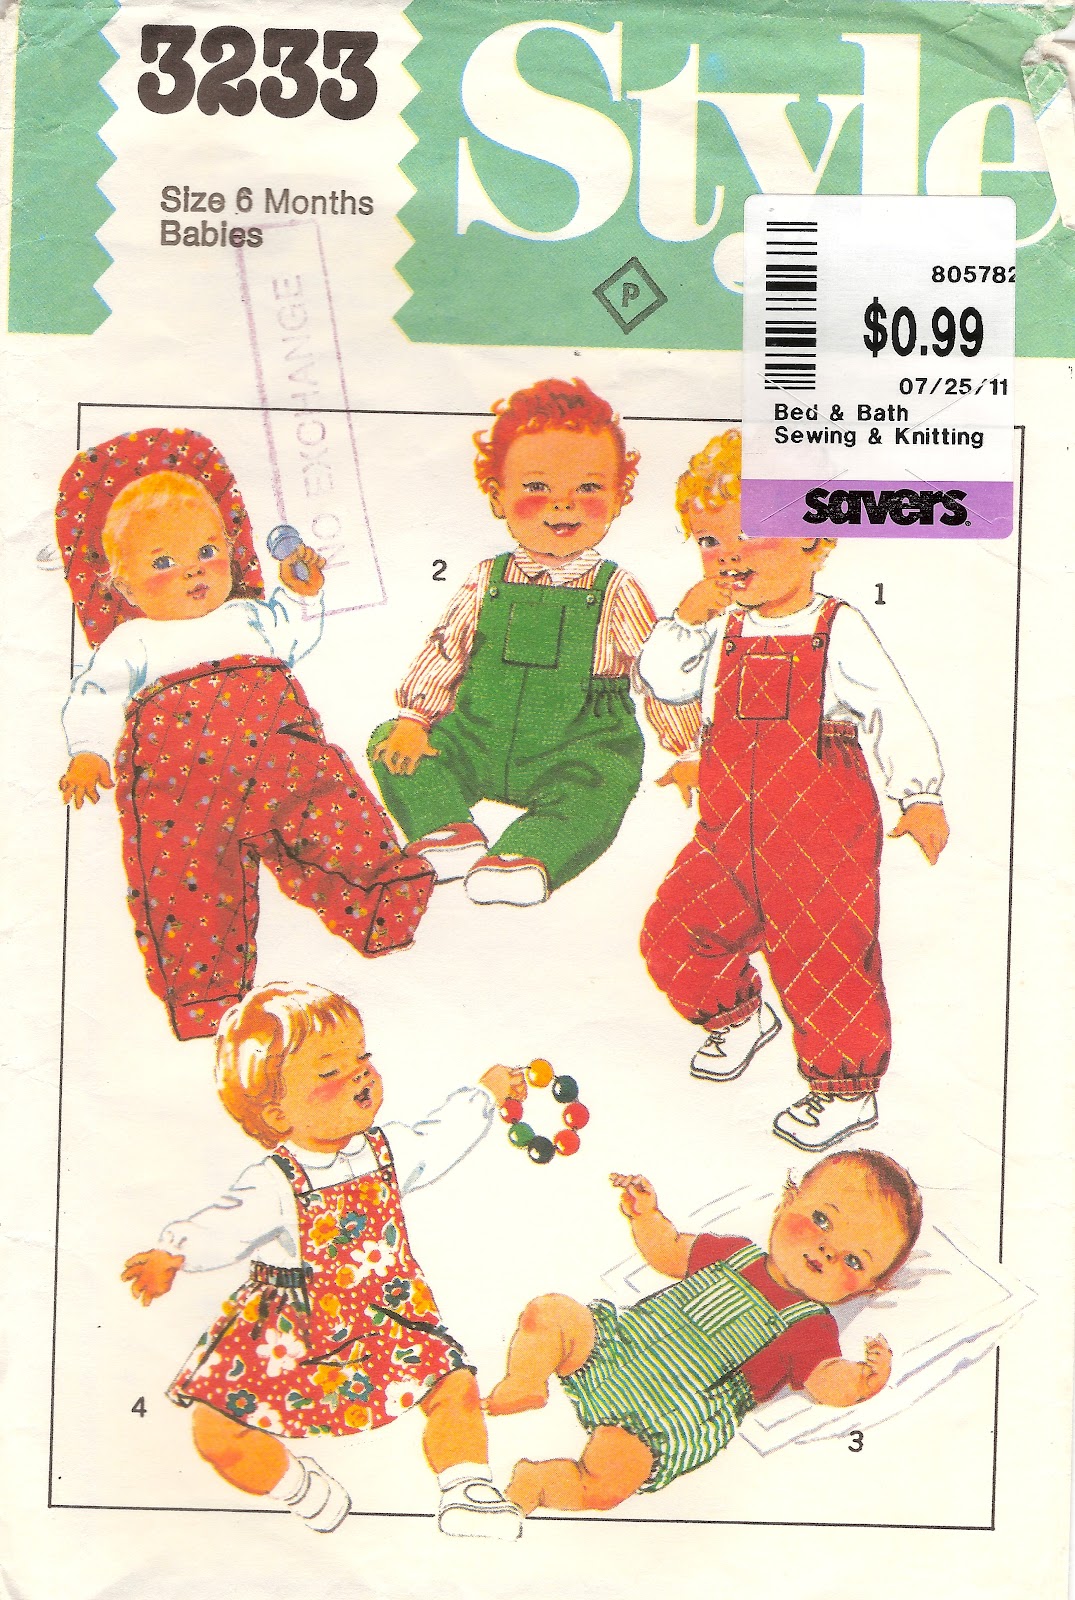
I bought the pattern for the 'cosy toes' view (top left). From where I stand it looks fantastic - no more lost socks/booties on the way to school, no more blankets falling off the bottom of the stroller when out for walks, etc. I pulled it out on the weekend, and found two bonuses:
- The fact that its an old single-size pattern meant I could use it as-is: no tracing off the size I was after. This is one of my least-favourite things about sewing, as it seems like such a long process to go through before getting down to the 'real thing' of cutting and sewing the fabric.
- The cosy toes pattern isn't actually designed for a six month old, its a 'one size fits all' through to 18 months. Brilliant. I've tricked myself into using the pattern, but I'll get to use the product this winter and next.

I've made it with some polka-dot cotton I bought from Darn Cheap Fabrics a couple of weeks ago, lined with offcuts of bamboo quilt wadding and some solid pink and a tiny bit of floral that's been in my stash for an embarrassingly long time. I did a butterfly applique on the back, mainly to hold the layers together (the seams do the job elsewhere). Not being one to reinvent the wheel, the butterfly came from this download. Now I just need it to stop raining so we can go for a walk and try it out.

Sunday, May 27, 2012
My most embarrassing roadside find
I'm not one to pass a hard waste collection without looking. I have been known to rearrange car seats to fit in furniture, rope in passers by to help me lift things into the boot, and even to partially dismantle furniture in order to fit it into my station wagon. However, as I was inspecting my latest pick-up a couple of months ago I felt that I'd reached hither-to unseen levels of embarrassment for my family (I even felt a tinge of it myself). The reason? I'd never picked up fabric off the side of the road before, what I was picking up looked like someone's painting drop sheets at first glance, and I was picking it up literally around the corner from our house. I can see their place from my bedroom window, and it felt just a tad close to home. The prize? A mint-condition (once they were washed) set of king size Sheridan sheets.
By way of background, I'd been looking for a grey fabric as backing to this quilt top, but to no avail. I wanted something with a bit of a fleck to it, rather than solid grey, and was discovering that grey is not exactly popular at present. The plan was to applique an Eiffel tower onto it to make the quilt truly reversable. Even from the car, the colour of these sheets were enough to make me stop on my way home and check them out. They proved to be unaffected by paint, or anything else that I could work out.
In the end I changed my mind a little, and have managed to produce this doona cover for the Schoolboy from the flat sheet:

A little patching was required on the back, covered by some strategically placed red stripes:

I made the matching pillowslip from the leftovers, cut the back of the quilt from the fitted sheet (even this showed no signs of wear - I'm assuming the grey didn't fit with their newly-renovated interior any longer), and have some fabric left over for another project. Not bad for 3 minutes of cringing by the side of the road!

Postscript:
By way of background, I'd been looking for a grey fabric as backing to this quilt top, but to no avail. I wanted something with a bit of a fleck to it, rather than solid grey, and was discovering that grey is not exactly popular at present. The plan was to applique an Eiffel tower onto it to make the quilt truly reversable. Even from the car, the colour of these sheets were enough to make me stop on my way home and check them out. They proved to be unaffected by paint, or anything else that I could work out.
In the end I changed my mind a little, and have managed to produce this doona cover for the Schoolboy from the flat sheet:

A little patching was required on the back, covered by some strategically placed red stripes:

I made the matching pillowslip from the leftovers, cut the back of the quilt from the fitted sheet (even this showed no signs of wear - I'm assuming the grey didn't fit with their newly-renovated interior any longer), and have some fabric left over for another project. Not bad for 3 minutes of cringing by the side of the road!

Postscript:
- The Schoolboy's declared this the best and most comfortable doona ever, but is consistently sleeping with the Eiffel tower facing down?!?
- The Kinderboy's now decided that he needs a black doona cover with a Kiwi on it.
- I'm wondering if either of them realize that we're Australian!
Tuesday, May 22, 2012
I finished something!
I'm feeling a bit 'stuck' craft-wise, so it was great to finish my Vogue artwork last night. Here it is:

Hmm. Slightly twisted on the page, but I can fix that up when I frame it.
I used two layers of tracing paper - the top layer has most of the drawing, plus a small amount of colour:

The layer underneath has most of the block colour, and some of the writing which I wanted to tone-down the colour of.
 I used a mixture of ink (the black), coloured
pencil and coloured card stuck down with double sided tape.
I used a mixture of ink (the black), coloured
pencil and coloured card stuck down with double sided tape.
Inspired? Want to make one? It's really simple, so if you're planning to do something similar I'd recommend choosing a simple line drawing, and making a few copies of it at the size that you're after.
I'd recommend cutting two layers of paper together where you have intersecting colours. For example, to do the socks and shoes I:

Hmm. Slightly twisted on the page, but I can fix that up when I frame it.
I used two layers of tracing paper - the top layer has most of the drawing, plus a small amount of colour:

The layer underneath has most of the block colour, and some of the writing which I wanted to tone-down the colour of.

Inspired? Want to make one? It's really simple, so if you're planning to do something similar I'd recommend choosing a simple line drawing, and making a few copies of it at the size that you're after.
Your first step is to trace the line drawing - primary school stuff right?!
And now some planning:
- If you're planning to use a texta for the line drawing, do a trial to make sure that it won't smudge! I had planned to use a marker for the red highlights, but found that the one I had on hand was going to smudge and switched to pencil instead.
- You'll need to think about how you adhere the layers together. I learnt from my son's Big Ben poster that double sided tape doesn't look that good stuck on the reverse side of tracing paper. So, rather than stick the blocks of colour to the back of the first layer of tracing paper (which is what we did with the Big Ben poster), I stuck mine onto a second layer of tracing paper. This way I could use my tape where it wouldn't be seen (I plan to join all of the layers together at the edges under a framing mat before hanging it on the wall).
- Check out what your planned colours look like underneath the tracing paper. The red I used is a lot more orange than I originally intended, but it looks heaps better (and less orange) under the tracing paper than my first preference. On a similar vein, I used a coloured tracing paper for the girls' blonde hair, but the adhesive 'Jac' paper I used to stick it down altered this to a solid colour, which was a bit disappointing at first.
- I used two layers of tracing paper, and would highly recommend it as opposed to attaching your coloured shapes to a solid background. Using the second layer of tracing paper allows you to stick down your coloured card without having double-sided tape showing from the front, and allows you to line up all of the layers more easily than if you only have one layer above the solid background.
Your next step will be to cut the blocks of colour from coloured card/paper. To do this accurately, place a copy of the picture over the top of your coloured card and then cut around the shape you're after (this is why you'll need a few copies of the picture).
- Layered black/red and white card on top of each other, then put a copy of the picture over the top of the lot,
- Cut the whole stack around the outline of the sock and shoes together (you have to be careful none of the layers move).
- Removed the white/sock card, and cut the picture and the black/red card around the shoe outline.
This way there is no gap between the sock and the shoe and there's no little bit of sock showing where the sock and shoe aren't cut exactly the same (hope that makes sense, I found it impossible to take photos while I was cutting!). You might be able to see that I didn't use this approach for the intersection between the little girl's hair and the middle girl's dress, and there's a bit of a gap there. Minor gaps are less visible once you put the line drawing over the top, but I know that if I think about it too much this bit of the picture will bug me!
 |
| I couldn't find any polka-dot paper, so I used coloured pencil on the trace to make my own. |
Finally, you can fill in some details with coloured pencil - I used pencil for the middle girl's shoes, the lighter sections on their toy (no idea what sort of animal it's supposed to be), the detailing on the smaller girls' dresses, the middle girl's headband, and the word 'pattern'.
Oh, and if you don't want to have to deal with it later, make sure that your drawing is square under the tracing paper before you begin!
Thanks for sticking with me all the way to the bottom! If you do decide to make a tracing paper artwork I'd love to see how it turns out - leave me a comment with your link.
Thursday, May 17, 2012
Vogue 2651 Wall Art
As I mentioned, I was inspired by the Schoolboy's Big Ben poster, and immediately pulled out one of my vintage Vogue patterns. I enlarged the envelope illustration, and made a start. It didn't take too long to work out that the texta that the Schoolboy used was way too thick for my purposes. Fast forward a week, and after spending way too much time faffing around with my Rotring pens, I finally came to the conclusion that leaving them sit for 20 years and then expecting to resurrect them was asking a bit much!
I ended up using a 0.5mm 'Pentel for Film' marker that I thought I'd lost. The actual drawing was quite quick, and here's my drawing after stage 1:

I'm finding it harder to find time to keep going than to actually do the construction, so here's where I'm up to now:

Here's a peek at how it looks underneath the top tracing paper layer. The process's quite simple, but I plan to show you more of a 'how to' once I'm finished...

I'm off to sign up and check out the new 'creative spaces' over here and here. I know, I know, if I did less of that I might be finished the picture by now, but I do love seeing what everyone else is up to!
I ended up using a 0.5mm 'Pentel for Film' marker that I thought I'd lost. The actual drawing was quite quick, and here's my drawing after stage 1:

I'm finding it harder to find time to keep going than to actually do the construction, so here's where I'm up to now:

Here's a peek at how it looks underneath the top tracing paper layer. The process's quite simple, but I plan to show you more of a 'how to' once I'm finished...

I'm off to sign up and check out the new 'creative spaces' over here and here. I know, I know, if I did less of that I might be finished the picture by now, but I do love seeing what everyone else is up to!
Monday, May 7, 2012
Inspired by the Schoolboy
The Schoolboy's doing a 'show and teach' on Big Ben to his class tomorrow. He was determined to draw a picture of it himself. His control freak of a mother was a bit worried about what that'd look like (he's brilliant, but most of what he draws is about 5cm tall and full of minute detail - not really visible in a classroom setting). This is what we came up with:

The drawing isn't actually 'his' - its a tracing of an enlarged version of this colouring page. He's done a brilliant job though, and using architectural tracing paper allowed him to add colour to the drawing from behind, rather than having to colour it in / trace using coloured paper.
I'm so impressed I think I'm going to have a shot using this vintage pattern, which you'll have seen before. (although now that I'm looking at it I'm torn between this one, Vogue 2678, and Vogue 2650). I have a million things to do first, but I'm 'home alone' with the kids tonight, so I can see the priorities being shifted a little, provided of course that I can decide which pattern to use...


The drawing isn't actually 'his' - its a tracing of an enlarged version of this colouring page. He's done a brilliant job though, and using architectural tracing paper allowed him to add colour to the drawing from behind, rather than having to colour it in / trace using coloured paper.
I'm so impressed I think I'm going to have a shot using this vintage pattern, which you'll have seen before. (although now that I'm looking at it I'm torn between this one, Vogue 2678, and Vogue 2650). I have a million things to do first, but I'm 'home alone' with the kids tonight, so I can see the priorities being shifted a little, provided of course that I can decide which pattern to use...

Thursday, February 23, 2012
Vintage bargains
The Schoolboy and I called into our local op shop yesterday on the pretext of donating some stuff.
It didn't take much coaxing on his part to have me having a 'bit of a look' to kill the time before kinder pick-up. I'm so glad I did, and that they weren't open the day before when I first tried to drop off my boxes. A collection of vintage patterns had just been donated, and they were still trying to work out whether to charge 10c or 20c each for them (?!?). I ended up with a selection of kids patterns for my loose change (the lady insisted on giving back the gold coins I tried to give her). I love them as much for the illustrations as for the patterns they contain:


It didn't take much coaxing on his part to have me having a 'bit of a look' to kill the time before kinder pick-up. I'm so glad I did, and that they weren't open the day before when I first tried to drop off my boxes. A collection of vintage patterns had just been donated, and they were still trying to work out whether to charge 10c or 20c each for them (?!?). I ended up with a selection of kids patterns for my loose change (the lady insisted on giving back the gold coins I tried to give her). I love them as much for the illustrations as for the patterns they contain:


The Style pattern dates from 1972, and I can remember wearing similar as a girl. One of the Vogue patterns is dated 1953, meaning that my mum could well have worn similar dresses made by my grandmother. Whilst the illustrations look quaint (and I can see myself framing them), I can see a lot of similarities between the style of some of these patterns and little girl patterns that are still available. I guess time will tell if I dare use them!
Sunday, December 11, 2011
Feeding chair [tick]
This afternoon I've completed a long-standing project. Here it is:

Years ago I salvaged this chair from a rubbish skip down the road:

It didn't look so bad back then - it had a lovely golden glow, but we ended up with too many chairs, it needed repair (the seat started to fall out of the bottom of it), and it ended up in the back yard for a couple of years. I cut a fresh seat for it from some timber salvaged from another roadside find and kidded myself that placing it under the eaves would protect it until I could get to re-finishing it with exterior varnish. Well, both the chair and its supplementary seat had seen better days, but I still loved the shape. In between time I'd also sold off a number of the chairs we had inside, so it was time for the 'captains chair' to be reinvigorated as a feeding chair for the baby's room.
Firstly I reinforced under the original seat:

Then I coated it with several layers of paint (I used interior/exterior primer first, just in case it ends up outside again).


I painted the supplementary seat too. I left it in two pieces because its such a tight fit that it needs to be in two pieces to fit it into the chair. I confess to being too lazy to fix the split that had developed on the left though.
I thenleft it for ages because I didn't know how to proceed next made a cushion for the seat from a combination of a foam cushion insert, a cut up scatter cushion (to fill out the curves), three layers of dacron (to try and make the lot look uniform) and some calico (to hold it all together). Today, having been inspired by this pin, I made a cushion cover from a men's jumper from the op shop. The cable knit hides the imperfections in the cushion underneath better than a more traditional cover (I had originally been envisaging something with piped edges).

You can still see the gaps in the timber seat, and I didn't fill all of the holes in the chair itself, but all up I'm pretty happy with the result considering where I started.

Years ago I salvaged this chair from a rubbish skip down the road:

It didn't look so bad back then - it had a lovely golden glow, but we ended up with too many chairs, it needed repair (the seat started to fall out of the bottom of it), and it ended up in the back yard for a couple of years. I cut a fresh seat for it from some timber salvaged from another roadside find and kidded myself that placing it under the eaves would protect it until I could get to re-finishing it with exterior varnish. Well, both the chair and its supplementary seat had seen better days, but I still loved the shape. In between time I'd also sold off a number of the chairs we had inside, so it was time for the 'captains chair' to be reinvigorated as a feeding chair for the baby's room.
Firstly I reinforced under the original seat:

Then I coated it with several layers of paint (I used interior/exterior primer first, just in case it ends up outside again).


I painted the supplementary seat too. I left it in two pieces because its such a tight fit that it needs to be in two pieces to fit it into the chair. I confess to being too lazy to fix the split that had developed on the left though.
I then

You can still see the gaps in the timber seat, and I didn't fill all of the holes in the chair itself, but all up I'm pretty happy with the result considering where I started.
Subscribe to:
Posts (Atom)
LinkWithin
