Did you know that this week is the inaugural National Op Shop Week here in Australia?
What's it all about? Well, apparently whilst we're shopping at op shops more we're not remembering to re-stock them with our own unwanted clothes. Being school holidays, I thought it was about time that I added to the boxes I started filling with stuff a couple of weeks ago. The dilemma now though is should I purge straight away and get them out of the house, or should I wait and donate them to the school fete?
For more details you can check out Peppermint Magazine (where I first heard of the Week), and the Do Something Near You website.
Tuesday, September 25, 2012
Wednesday, September 19, 2012
Butterfly specimen art
I have a piece of artwork underway for the girl's room. It's way too complicated, and as a consequence is going no where fast. I feel sad for her that the only things hanging on her wall are a group of five blank canvases (for the aforementioned artwork) and a clock. So, rather than actually make progress on the first project, I've completed a quick fix in the last couple of days:


I'm the first to acknowledge that this is certainly not an original idea. In fact, it wasn't an original idea when I made something similar for my niece about 5 years ago. But I love it just the same. It is also simple, and I thought I'd share my process with you, just in case you're inspired to do something similar.
Materials:
Butterfly print fabric
Iron on interfacing
Thick card for the background
Process:
I started out with some offcuts of the 'Illuminating Spring' (by Stephanie Marrot for Wilmington Prints) butterfly fabric I used in this skirt (I have more left over, so they'll make another appearance at some point). I then ironed some non-woven iron-on interfacing on the back. I'd suggest using the stiffest that you have. As my fabric was an odd size, I used a sheet of baking paper over it to stop the excess interfacing sticking to the iron or the ironing board.

I then cut out full butterflies (there were some on the fabric with their wings folded, and I didn't use these), and by sheer luck my offcuts yielded 37 butterflies. I needed 36 for my project. I used nail scissors for the cutting, as they allowed the precision I needed. I wasn't too fussed if there was a small amount of background fabric left around each, and I also elected to cut off the antennae.

I then placed the butterflies in an arrangement that I was happy with, with the aim being to distribute the coloured ones throughout the frames. The hard bit then was to work out what the spacing should be and how to line them up on the background.

Somewhere around about here I cut my thick card into squares the right size to fit inside my frames. You need something with enough strength to take the weight of your butterflies without sagging over time.
I decided that I wanted to top of the wings to line up, rather than the bodies, and found that my quilting ruler was the best help for this. Just be careful to learn from my mistake, and account for the width of any matt when placing the butterflies - I had to remove these three and start again, as I was too close to the top of my backing board! Also, I found it easier to work upside down and to start with the bottom row, that way my ruler wasn't sitting on butterflies I'd already glued in place.

Now, fold your first butterfly in half, right sides together, so that your fold is along the body. Then apply hot glue to the wrong side of the body (ie. the outside of the fold). Press on to your background cardboard in the desired location, trying to keep the butterfly as folded as possible, but also making sure that the glue isn't attaching the two wings to each other. You'll need to work pretty fast, as the glue cools and sets quite quickly.

Repeat for the rest of your butterflies.
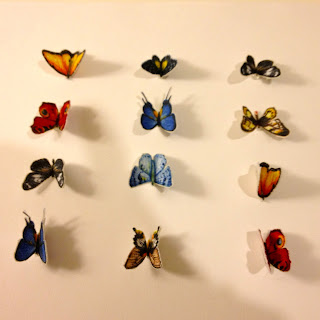
When the glue has cooled and set you can squeeze the wings together a bit more if you like. You can also pull off any glue threads that may be floating around.

Now you can frame them. I used frames with double mounts, and the butterflies sat up from the backing cardboard enough to make a shadow, but the glass did flatten them more than I expected. You could use a box frame if you wanted a more pronounced fold in the butterflies.
PS. See that red butterfly in the middle? It was really annoying me, as I attached it too low and the one below it too high. I used a scalpel and carefully cut them off the background, then re-glued them in place. Whilst you need to work quickly with the glue, mistakes can be rectified!
PPS. My butterfly fabric has a cream background, but the fabric that I used for my niece had a black background, and the butterflies looked quite different from the fabric itself once they were cut out and mounted on off-white card. Look at the colour of the butterflies, rather than the colour of the fabric when you're choosing a fabric for this project.
PPS. There are more butterfly art & craft ideas in my 'artwork I could try myself' Pinterest board...
Oh, and the Girl is more than happy to have something to look at on her walls at last:

Wednesday, September 12, 2012
A-line #2 (Playing Fabric Chicken)
I'm not sure if its evident in what I make or not, but I usually wear solid colours. I'm not really into patterns or text on clothing. Not sure why. It surprised me then, that last year I was attracted enough to some large floral fabric to order it from the States with no particular end-product in mind. I wear a lot of red and black, and also white, and with the days getting warmer over the last few weeks, I decided to break out and turn it into another A-line skirt. There was only a yard (90cm) of the fabric, and the pattern calls for 2m, so figuring out how to cut it out and the length of the finished product took at least as long as the actual construction process. Here's my finished product:

The pockets are both for practicality, and also allowed me to overlap the pieces more on the fabric, meaning that I could keep this length without adding a contrast bottom at the hem. They're from the Aztec skirt in the Autumn/Winter 2012 Ottobre Design magazine.
To save fabric I also needed to ignore the direction of the print! The back it cut upside down, and as you can see I haven't made any attempt to match the pattern. I also cut separate 5.5cm wide hem facings for the bottom (cut at 90 degrees to the rest of the skirt) to maximise the length of the finished product.


Lessons/Comments:

The pockets are both for practicality, and also allowed me to overlap the pieces more on the fabric, meaning that I could keep this length without adding a contrast bottom at the hem. They're from the Aztec skirt in the Autumn/Winter 2012 Ottobre Design magazine.
To save fabric I also needed to ignore the direction of the print! The back it cut upside down, and as you can see I haven't made any attempt to match the pattern. I also cut separate 5.5cm wide hem facings for the bottom (cut at 90 degrees to the rest of the skirt) to maximise the length of the finished product.

Here's the complete details:
Pattern: Nicole Mallalieu's A-line skirt
Size: 12
Modifications:
Pattern: Nicole Mallalieu's A-line skirt
Size: 12
Modifications:
- I shortened the pattern by 23cm, and cut separate hem facings. This allowed me to make a skirt that is around 20cm shorter than the pattern from my miniscule amount of fabric.
- As with the Butterfly Skirt, I trimmed the yoke by 1" at the waist.
- I cut the waistband from a contrast fabric (again, saving my floral fabric). I'm not sure if I like the look of it or not, but the reality is that most of the time my top will hide it, as you can see in this dodgy self-taken shot.

- I added pockets, using white for the underpocket piece, so that the red wouldn't show through the floral fabric:
 |
| I used a 5mm seam, and then under-sewed the allowance to the white fabric. |
I then attached the red pocket piece to this (pinning across the top and the pocket opening and then sewing all round the outside of the pocket):

From there I treated the whole as if it were a single bit of material, and made up the skirt as usual.
Materials:
90cm of 'Artful Home' quilting cotton by Heather Mulder Peterson; and
'Jester' red cotton from the stash, but originally from Spotlight (I think I should have bought a bolt of this, I love the colour so much)
Lessons/Comments:
- I didn't use the blind hemming foot to stitch in the ditch this time, and wished that I had. I also hand-hemmed it, and found that I would have been just as happy with the finished product if I had machine hemmed it like last time.
- Making this skirt reminded me of this post over at Made by Rae. She lists the length of material she buys if she doesn't have a project in mind. Also, LiEr gives a good rule of thumb over here.
Subscribe to:
Comments (Atom)