Showing posts with label Kids. Show all posts

Wednesday, February 26, 2014

A little bit of Yardage


A week or so back Nic from Yardage Design had a samples and seconds sale.  I filled up my cart, and emptied it again.  Surely I don't need any more fabric, and things are tight on the money front.

In the end I justified settled for a tea towel and a fat quarter.  The fat quarter's Verano Leaves in crimson.  I love both this design and her Verano petals (I still haven't found anywhere to use these cupboards in the new house though, so they're languishing in the garage).  I thought the fabric'd make a great 'handbag' for the young one.  She's very girly, and a bag of some sort is well overdue.

Well, the fabric arrived a few days ago, and I decided that I needed the Verano Leaves for myself.  Operating on the theory that its linen and therefore should be suited to the task, I've made it into a second tea towel (I'm fantasising about the new kitchen it'd look great in).


Fortuitously, Nic sent the fabric through in a calico bag which, with the young one's approval, became a handbag this morning.  I added some extra calico, and some firm iron-on interfacing so that its reasonably stiff, as well as fully lined.  A zipper, webbing, and the obligatory red cotton fabric, from the stash make it complete.  I'm really pleased with the outcome, and glad to say that she's also very happy with it.


PS.  I am assuming that the print on the bag wasn't heat set, but didn't think to iron it before I washed it, so it has faded a little in patches.  This isn't reflective of Nic's fabric or other items, which I've never had that issue with.

PPS.  This post is in no way sponsored, although you'd be forgiven for thinking so!

Wednesday, February 5, 2014

My [new] creative space


Hi, remember me?  I thought that it was probably about time that I re-surfaced and shared some of what I've been up to.  Like so many others, I've been finding that life's a bit too full to blog lately.  Suffice to say there's been big changes (new house, full time job, etc.) since the last post.  I have managed to squeeze in some crafting though, and am really happy that in the last month or so that's included some time in the shed.

This week I've finished (well, manufactured, undercoated and installed) some narrow shelves on the side of the small one's wardrobe.  The wardrobe itself is built in, but only made of chipboard, meaning that the Cyclist and I installed the shelves by drilling and screwing straight through the end wall of the wardrobe and into the timber.  They'll get their final coats of paint when we paint the room sometime later this year.  In the meantime, they're housing some of our favourite reads (except when Abbie's emptied the bottom two shelves so she can sit on the floor and 'read' aloud to herself instead of sleeping).

Abbie loves them, and so do I - its an idea I've been wanting to use for a long time, and this's the perfect spot for it.  She's two, so I figure we have a while before picture books are packed away.  After that I can see them used to show off favourite pictures and photos.


Thursday, May 2, 2013

Upsized Clara


Have you seen the Clara dress pattern?  I fell in love with it before my daughter was born and tried to buy it.  My bank's security system wouldn't let the transaction through - when I contacted Isager because my order didn't seem to be being processed, they advised that this isn't uncommon for Australian customers.  Apparently the 'falcon' thinks that you're trying to shop in person in the US when it knows you were only down the street using your card 20 minutes ago, and it rejects the transaction.  Over a year went by, and I tried again (this time with a card from a smaller bank), and was successful.  The problem is, that the pattern is sized for a chest circumference of up to 20", and that's my daugher's current measurement.  I didn't want to go to the effort of making the dress only to have her grow out of it before winter is over.

Well, after many calculations and much trial and error, I've finally finished my 18-24 month size of the pattern.  I managed to make it out of the two skeins (500m) of wool in the kit, with just 2m to spare (most of the calculations were me working out how many stitches I could expect to knit out of each gram of yarn, and therefore how long I could afford to make the skirt!).

In summary I:
  • Cast on 260 sts (after I had nearly finished I read other posts on Ravelry, and yes it would have been easier to use 261stitches, and decrease one stitch in the first round of the pattern)
  • Then followed the pattern, knitting to a length of 29 cm / 11.5 inches
  • Split into rows at the start of the moss band beneath the bodice, 'splicing' it to create a lapped opening.  
  • Included a moss stitch button band on both ends of the row as I was knitting from this point forward, adjusting the pattern accordingly, and evenly spacing three buttonholes.  In hindsight I would have put the bottom buttonhole in the horizontal moss band - it pulls a little.
  • Knitted the 'set sleeve' row as follows: Moss 5, k26 sts, place next 10 sts on holder, CO 65 sts, k54 sts, place next 10 sts on holder, CO 65 sts, k25 sts, moss 5 (245 sts on needle). 
  • Inserted one additional WS row after Rnd 1, three additional rows (with only one k2tog tbl in each repeat for right-side rows - ie. no decreasing over the length of the row) after 'Rnd 14', and two each after Row 1, Row 3 and Row 5.
  • Omitted Row 9 and Row 10 (giving a total of 32 rows from the top of the moss band to the bottom of the neckband).
  • Knitted up 77 stitches for each sleeve band.  Due to my yarn restrictions I knitted eight rows on each.


No, she doesn't usually get to play with sticks!

I'm joining up over here, and will be checking out what other people are up to working shortly.
Joined up here too.

Thursday, March 28, 2013

Introducing Beth Bunny


There have been lots of 'starts' in our household in the last few months, but precious few 'finishes', so I'm proud to have a 'nearly there' to show off today!  I've admired Alicia Paulson's Miss Maggie Rabbit pattern for a while now, and this week I not only managed to buy it, but make a version of it.  If you follow the link to the pattern you'll probably wonder whether in fact I followed it, so here's the rundown on why Beth is Beth and not Maggie:

The fabric:  The pattern calls for felt.  I didn't have any, and am determined to use up my stash.  What I did find was a small leftover piece of woven faux fur fabric.  Not only was it just enough to make Beth, but it is actually a scrap from when my Grandma made me 'Big Bun' when I was two (I'll take a photo when the young one wakes up, but safe to say I've always been very unimaginative in naming things!).  

The construction:  Felt doesn't fray, but my fabric will, so instead of exposed hand-stitching, I used a moderately wide zig-zag and a short stitch length on the machine to construct most of Beth.  To facilitate this I cut the ears about 4mm larger all round than the pattern shows, to allow for turning (I also ended up with nearly 1cm of seam allowance at the base of the ears this way).  I stitched along the edge of the fabric, so for the other pieces I figured that my seam allowance was about the same as Alicia used.

I decided that I wanted Beth's ears to stand up, so before I stuffed her head I pinned the seam allowance at the bottom of the ears to the side of her head from the outside.  I removed the pins after her head was firmly stuffed, and her ears definitely stand up!  Pinning the seam allowances to the top of her head would have given her floppy ears instead.

One drawback of my fabric choice was that I had difficulty seeing what I was sewing when it came to hand-sewing on Beth's arms and legs.  I went round each a couple of times just in case - I don't want to be fixing severed limbs later!
 
The colours:  I used a paler nose and whiskers for Beth, given her white fur, but I wish now that I'd made the whiskers the same colour as her nose.

The dress:  The dress is a cut-down of a peasant top that the young one wore when she was 3 months old.  It already had the smocking on the front, elastic on the sleeves, the ruffle on the bottom and a button tab down the back.  I used Alicia's pattern as a guide for the sizing of the pieces (although my sleeves are shorter and the dress is longer by the depth of the ruffle).  

The finishing touches:  I do have some red felt in the stash, and have cut out some little boots to finish her off.  All being well this'll happen before Sunday, so that Beth can be carefully placed for the young one to find on Sunday when her brothers are hunting Easter eggs.

Happy Easter!

Thursday, December 13, 2012

Mayhem

Today's the start of 2 1/2 weeks of craziness in our household - three birthdays and Christmas in the space of 19 days.  Here's a quick rundown of what I've been up to in the lead-up to birthday season...


I made two lengths of this felt bunting (no-fray => less stitching required) to decorate the church hall for the kids' party.  I printed the letters onto paper, then cut the paper and felt together and stitched them on with a straight stitch.  Reasonably quick, and we'll use it for years to come.


Made to measure felt crown (double layer of felt for more body), with lace and ric-rac that used to belong to my Grandma.


The Kinderboy and I picked just under 11kg of [tiny but sweet] apricots from our tree, then enlisted the Ipswich nieces to help us sort and cut them.  We gave away some, ate some, and swapped some for lemons with the lady across the road, and now I have 15 jars of apricot jam cooling downstairs (not the best job on a 35 degree day, but the apricots don't give you a choice!)


Last of all, I had a morning off and finally finished some stretch linen pants for myself from the Spring/Summer 2012 Ottobre Woman magazine.   Strangely, I had to shorten them by 20cm to get to the length shown in the magazine.  I'm short, but not that short, so I'm not sure what the story is - its the first time I've used any of their women's patterns, so I guess I'll keep an eye out on sizing in the future as well.  Sorry about the lack of modeled shots - I'm lousy at taking them myself, and too self-conscious to ask the family to do it!


Next on the agenda are some class Christmas cards (as shown here), and finishing off some Christmas presents.  I have a hankering for new clothes for myself though, and Darn Cheap Fabrics has a sale on, so a diversion may be on the cards.  In the meantime, I'm going to settle for heading over to Village Voices for more crafty ideas (it's where I first saw the cards too).

Friday, November 30, 2012

Short orders

In celebration of National Recycling Week (or because my 'revamp/repair' box was overflowing), last week I whipped up a couple of T-shirts for the boys from three that the Cyclist had discarded plus a bit of my ever-present red cotton.  I say 'whipped up' as if it were no trouble at all, but truth be known that this time last year I wouldn't have even attempted it.  Its amazing what 12 months, a twin needle and an overlocker will do for you!


I used the Headphones/Globe Kids pattern from Ottobre 3/2012, but rounded the neck.  Based on my experience with this shirt, I checked the pattern pieces against some of our existing T-shirts, and ended up sewing a size 134 for both boys, even though they measure a size or two smaller.


The only complaint?  The Cyclist wished that I'd slimmed the shirts down for him instead.

To round it out I made this little 'Sweet Dress' for the youngest.  Using broderie anglaise made it even quicker to sew, and I'm proud that I managed to go from the fabric store to finished product in less than two days.  Considering that most of my stash takes a decade or so to see the light of day that has to be some sort of record!


Instead of wholly encasing the neck elastic I put two buttonholes through the dress front before sewing the casing, and threaded through elastic with some ribbon on each end.  Hopefully that way it'll grow from a dress this summer to a top next year.  I also left off the armhole elastic.


I've been blessed with an unexpected free hour or so, so I'm going to amble over here and here and link up and check out what others have been up to.  Thanks for stopping by!

Wednesday, November 14, 2012

In miniature

I'm still going on my 'clothing baby' projects (I have some more clothes nearly ready to show you), and I haven't forgotten my promise to make the Kinderboy a shirt, but in a side project I've made baby a little bear of her own.


This little bear measures just under 12cm in height, and I have to admit that I came across it accident.  Some time ago I knitted all the parts to it, but stopped at that.  It has been buried in my scrap wool pile ever since.  I'm not sure who the original recipient was intended to be (although I suspect that it was the Schoolboy), but as every baby needs a teddy I've finished him and handed him over to Cate for safe-keeping.

Thursday, November 8, 2012

Clothing baby

My little one is into dolls.  She's not even one yet, but fell in love with this little Berenguer baby at the op shop a month or so ago.  I bought her with the intention of washing her up, dressing her, and then presenting her as a first birthday gift in December.  The only problem is, that she's been floating in and out of boxes and bags as I try and work on clothing, and each time the Newbie smothers her in kisses and I feel mean packing her away again.  Its very cute, but I'm determined to stick to my guns and clothe little 'Cate' before handing her over.

I'm working on some knitting as well as sewing projects, but this is the first one that I've finished:


It's from the 'Nakey Baby' project over at The Blueberry Moon.

Modifications:  
I used a woven fabric, and found that I needed some added width to make it go over my baby's arms.  I increased the width of the sleeves by 5.5cm, and if/when I do it again I'll also widen the body sections a little for ease of dressing.

I increased the length of the pattern slightly, to match the scrap that I was using.  It turned out to be equivalent to the depth of the top and bottom hems.

Lessons/Comments:  
The bodice sections would make the good basis for a 'pillowcase' type dress.

For reference, my baby is around 13" long.

I'm linking up over here, so I'll see you there once I've actually done some paid work for the morning!

Monday, October 29, 2012

Shirt for the Schoolboy

I've finally finished the shirt that I was going to make for the Schoolboy during Kids Clothing Week.  I've been plugging away at it bit by bit, and am really happy with the result:


I took a long time lining the pattern pieces up on the fabric for this shirt, and I love the 'invisible' pocket (and his amazement when he found it),


am really proud of the way the back and the yoke line up,


but not sure why it is that I cut the right sleeve out upside down (or why I didn't realise exactly what was wrong with it until the shirt was finished)!

All fabric and button choices were the Schoolboy's.

The pattern is 'Apple' from the Summer 2010 Ottobre magazine, altered to include some snippets of red gingham.  This's the first of the kids patterns I've sewed from the magazines, and I have to say it seems quite slim fitting.  My boys are very different builds (same chest and waist measurements, but 10-12 cm difference in height), and the Schoolboy is both slender and likes his shirts slim-fitting.  I used a size 128 to match his height even though his chest was smaller than the size chart, and am glad I did - a narrower fitting may not have been big enough.  As it is he's slightly miffed that I'm going to make his brother's shirt the same size!

Monday, October 15, 2012

KCWC: Leila & Ben's Sweet Dress #2

Hmmm.  Kids clothing week was supposed to be about the boys.  Can't really see either of them wearing this little dress:

The youngest, however, is rather taken with it, and Melbourne may even warm up enough for me to put her into short sleeves sometime in the next day or so.  KCWC is officially over, but I'm going to keep going at it (half-paced as I am, my counter is currently up to 3:41:07.9), and boys shirts are next on my list.  I promise boys.

Here's the details for the spotty dress:

Pattern:  Leila & Ben's Sweet Little Dress 
Size:      12 months

Modifications:  
As with the previous version, I used my overlocker for all of the seams.  I also straightened the hem, because a curved bottom just looked strange with all those dots.

I'm thinking of adding a little embellishment on one of the dots, but more of that later (I still need to be convinced that she won't eat what I have in mind!)

Materials:  
Poly-cotton from my stash, left over from these dresses.

Lessons/Comments:  
I learnt from my mistake last time round, and tried it on her before cutting and stitching the elastic.

Wednesday, October 10, 2012

KCWC: Leila & Ben's Sweet Dress

Afternoon!  My KCWC counter is up to 1:55:37.0, which means that I 'steal' more sewing time during the day than I had realised.  Perhaps I should keep the timer up, to make sure my "I'll just be 5 minutes boys" sewing sessions don't routinely turn out to be 25 minutes like this morning's one.  Anyway, enough of the guilt trip, here's what I have to show:


Here's the details:

Pattern:  Leila & Ben's Sweet Little Dress 
Size:      12 months

Modifications:  
I was inspired by this dress, and gathered the neckline and sleeves onto a knit band rather than using elastic in a casing.  I cut the bands the same length as the elastic specified in the pattern, and made them 4cm wide.  The top is also shorter than the pattern (more tunic rather than dress length), based on the length of the brown top I started with.


Materials:  
All from the 'For repair or remodelling' box in my cupboard!  The front and back are from an old top of mine, but as the sleeves on it were too narrow I used fabric from another top for the sleeves, and part of a third for the band (my original top also had blue sleeves and a white band around the neckline).

Lessons/Comments:  
Peasant dresses/tops are super quick and easy (I nearly doubled the time involved by using the neck and sleeve bands), and I'll definitely be making more.  


I finished this dress before trying it on the young one, and found that the neckline was way too big for her.  So my dilemma now is - do I pull the neckband off and make it smaller, or wait until next year for her to wear it (this neck and armholes are similar to some size 2 tops I have).  I love it as it is, so I think I'll put it away for now, but the lesson is definitely to try things as you go if you're going to modify patterns (and also be suspicious and check if a pattern tells you to cut the same length of elastic for a 1 year old's dress as a 5 year old's!).

Tuesday, October 9, 2012

Kids in the Kitchen

I love making kid-size apron and chef's hat combo's.  I've done a few as presents since first making a set for my Schoolboy about 5 years ago.  The Kinderboy went to a friend's birthday at Kids in the Kitchen on Saturday.  They had heaps of fun, and I thought that a hat and apron would be appropriate.  I finished it after the party though, so they've made their way to their new owner this morning.

His mother would describe her son as a 'wee little one' (she's a Kiwi and 'wee' is a description I love to hear her use, but somehow it doesn't sound right in an Aussie accent), so the hat's adjustable in case he still wants to wear it when he's bigger.  Six buttons and four buttonholes 'cos my velcro is way to stiff and scratchy.

Don't you love the fabric!  Just the right level of cuteness for a 4 year old I think.

You might have noticed that I've added the Kids Clothing Week logo to my side bar.  I've signed up, and am determined not to cheat and count Saturday's sewing towards the week.  However, life being what it is I can't see any sewing time on the horizon, and I've decided to use my phone's stop watch to tally up the week's sewing to see if I've met the overall challenge or not.  How about you, have you signed up?  What are your plans for the week?


Wednesday, September 19, 2012

Butterfly specimen art

I have a piece of artwork underway for the girl's room.  It's way too complicated, and as a consequence is going no where fast.  I feel sad for her that the only things hanging on her wall are a group of five blank canvases (for the aforementioned artwork) and a clock.  So, rather than actually make progress on the first project, I've completed a quick fix in the last couple of days:


I'm the first to acknowledge that this is certainly not an original idea.  In fact, it wasn't an original idea when I made something similar for my niece about 5 years ago.  But I love it just the same.  It is also simple, and I thought I'd share my process with you, just in case you're inspired to do something similar.

Materials:
Butterfly print fabric
Iron on interfacing
Thick card for the background

Process:
I started out with some offcuts of the  'Illuminating Spring' (by Stephanie Marrot for Wilmington Prints)  butterfly fabric I used in this skirt (I have more left over, so they'll make another appearance at some point).  I then ironed some non-woven iron-on interfacing on the back.  I'd suggest using the stiffest that you have.  As my fabric was an odd size, I used a sheet of baking paper over it to stop the excess interfacing sticking to the iron or the ironing board.


I then cut out full butterflies (there were some on the fabric with their wings folded, and I didn't use these), and by sheer luck my offcuts yielded 37 butterflies.  I needed 36 for my project.  I used nail scissors for the cutting, as they allowed the precision I needed.  I wasn't too fussed if there was a small amount of background fabric left around each, and I also elected to cut off the antennae.


I then placed the butterflies in an arrangement that I was happy with, with the aim being to distribute the coloured ones throughout the frames.  The hard bit then was to work out what the spacing should be and how to line them up on the background.


Somewhere around about here I cut my thick card into squares the right size to fit inside my frames.  You need something with enough strength to take the weight of your butterflies without sagging over time.

I decided that I wanted to top of the wings to line up, rather than the bodies, and found that my quilting ruler was the best help for this.  Just be careful to learn from my mistake, and account for the width of any matt when placing the butterflies - I had to remove these three and start again, as I was too close to the top of my backing board!  Also, I found it easier to work upside down and to start with the bottom row, that way my ruler wasn't sitting on butterflies I'd already glued in place.


Now, fold your first butterfly in half, right sides together, so that your fold is along the body.  Then apply hot glue to the wrong side of the body (ie. the outside of the fold).  Press on to your background cardboard in the desired location, trying to keep the butterfly as folded as possible, but also making sure that the glue isn't attaching the two wings to each other.  You'll need to work pretty fast, as the glue cools and sets quite quickly.


Repeat for the rest of your butterflies.


When the glue has cooled and set you can squeeze the wings together a bit more if you like.  You can also pull off any glue threads that may be floating around.


Now you can frame them.  I used frames with double mounts, and the butterflies sat up from the backing cardboard enough to make a shadow, but the glass did flatten them more than I expected.  You could use a box frame if you wanted a more pronounced fold in the butterflies.

PS.  See that red butterfly in the middle?  It was really annoying me, as I attached it too low and the one below it too high.  I used a scalpel and carefully cut them off the background, then re-glued them in place.  Whilst you need to work quickly with the glue, mistakes can be rectified!

PPS.  My butterfly fabric has a cream background, but the fabric that I used for my niece had a black background, and the butterflies looked quite different from the fabric itself once they were cut out and mounted on off-white card.  Look at the colour of the butterflies, rather than the colour of the fabric when you're choosing a fabric for this project.

PPS.  There are more butterfly art & craft ideas in my 'artwork I could try myself' Pinterest board...

Oh, and the Girl is more than happy to have something to look at on her walls at last:


Tuesday, July 31, 2012

A hybrid top

As I mentioned in my last post, I loved the way the Topkids 63/3 top came together, but felt that sleeves were in order.

I'd love to learn to draft patterns, but the idea of drafting a sleeve pattern is just way too daunting (or perhaps, just a little time consuming) for me at this point in time.  I pulled out the trusty Simplicity 4243, and found to my surprise that in fact the two tops have a very similar cut.  I overlaid the two pattern pieces to redraft the sleeve shape of my Topkids pattern, and was then able to use the Simplicity View E sleeve.  I also shortened the pattern by 14cm whilst I was at it.  All in all it was a pretty simple process once I remembered that the Simplicity pattern uses a mixture of seam allowances.  Not at all like my previous experience of trying to merge two patterns together for myself!


I'm really happy with the result, and am already planning another from my stash.  I think I'll round the back neckline this time too (I might just use the back pattern piece from the Simplicity pattern).


Saturday, July 28, 2012

Pillowcase Dress #3: Topkids 63, Design 3

Here's the first of my 'Pillowcases 6 Ways' dresses for the upcoming spring and summer:


I finished it today, on what has to be one of Melbourne's most wintery days in what feels like the coldest and wettest winter for a long time, so there won't be any modelled shots for some time!

The pattern is from a Topkids magazine.  I discovered these magazines at my local library a few years ago, and subsequently bought some used ones on e-bay.  They've been out of print for some time (from what I can ascertain most of mine date from the late 1990s), and whilst some of the designs are a bit dated, plenty of them have appeal.

I found in using the first dress that the blue pattern on the pillowcases fades as it is washed (great if you've embroidered over it, but not so good if you're relying on it for decoration), so this time I used part of the patterned section of the pillowcase and selectively embroidered it using a simple backstitch.  I'm banking on the blue you can see fading within 2-3 washes.


The ric-rac is unforgivingly narrow, and comes from the stash I inherited from my Grandmother.  There's loads more of it, so hopefully I'll become more skilled in sewing it on accurately with practice.  The buttons were from the op shop, giving the dress a total purchase price of 30 cents!


The pattern came together quite well, however I have noticed that I already have several sleeveless tops/dresses for A for this spring/summer, so I'm thinking of making another version with sleeves.  I think I'll also make it tunic length, to make it easier for her to crawl in when the time comes.

The background and my 'rules' for the Pillowcases 6 Ways challenge can be found here, and my previous creations are here and here.

Thursday, July 5, 2012

The "Big Boy's" Creative Space

My eldest has declared he wants to be known as the 'Big Boy', even though he knows that within a couple of years his younger brother (by three years) will be taller than him.  Being school holidays, today's Creative Space is all about the Big Boy.  Here's what he came up with yesterday:

Pikachu from Lego

 3D hand picture inspired by this Pin.

He's thrilled with both, and now wants to do more drawings of his hand and of other shapes (a hot air balloon is next I understand).

There's also been a whole lot of CS Lewis (he's made a Lego Dawn Treader and associated paraphernalia), interspersed with Nintendo, going on here.  How are your holidays panning out?  Does a break from school mean more or less creative time for you?

Thursday, June 21, 2012

Cosy toes

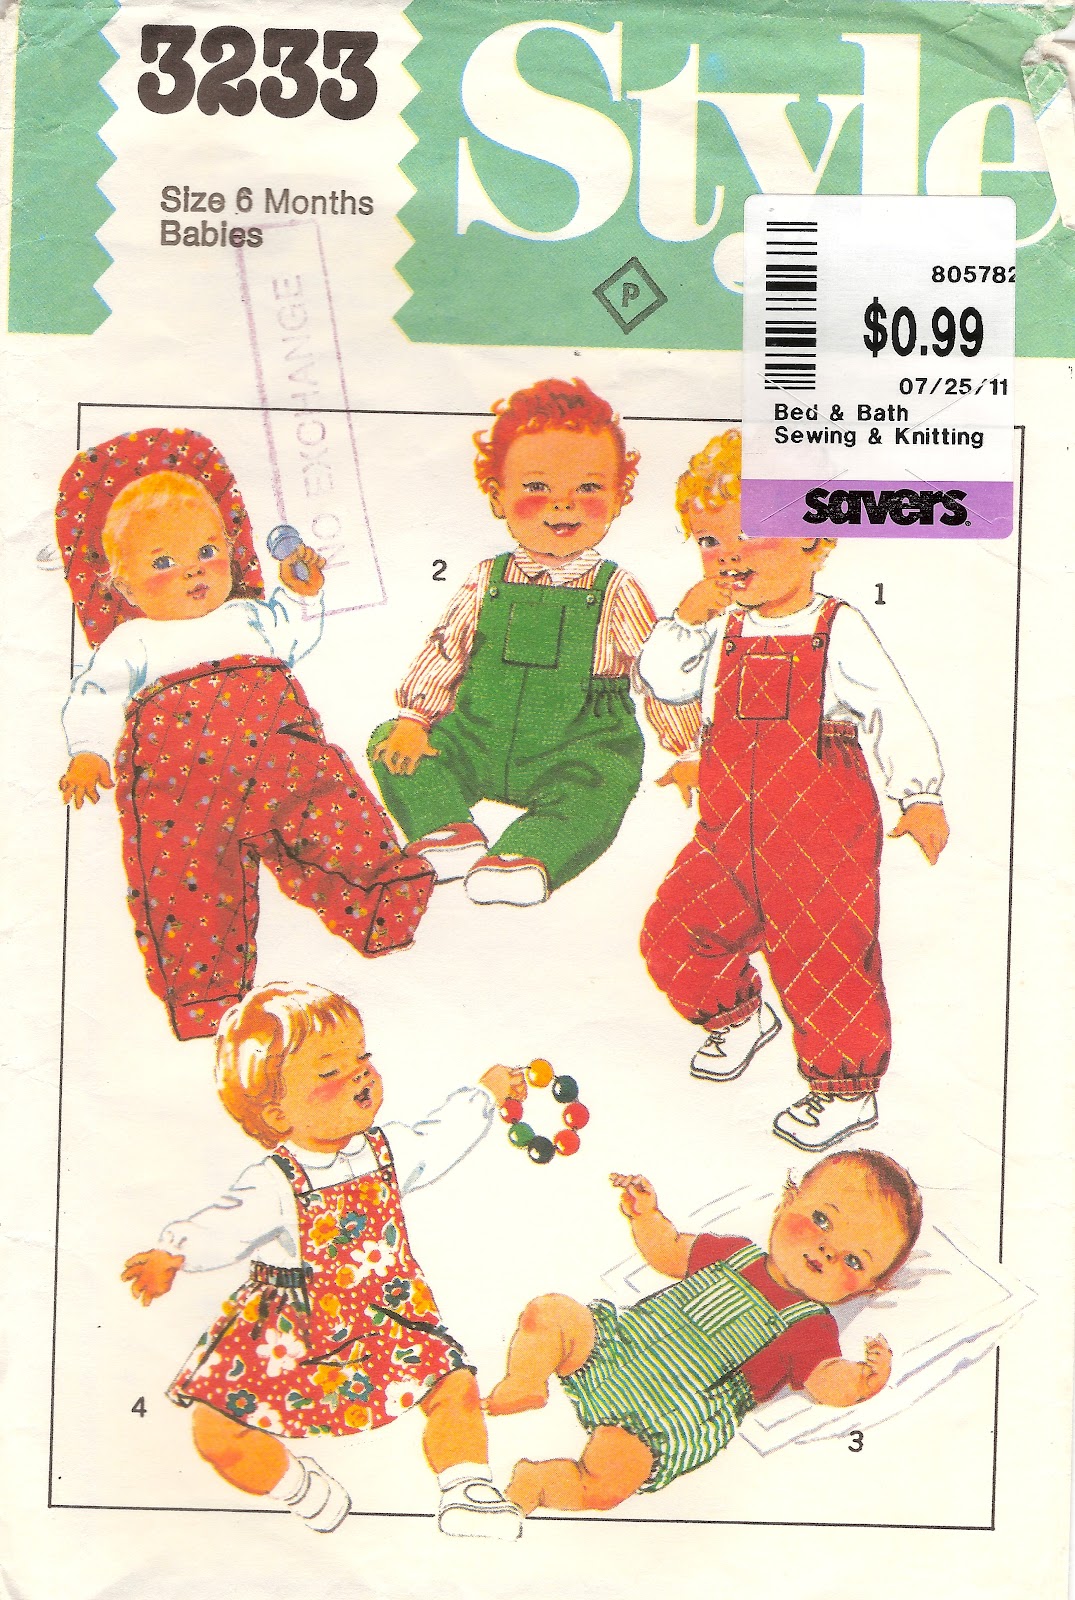
I bought a number of patterns from Savers last winter.  My pattern drawer's overflowing (well, actually its a drawer and a box now), and I was determined to only buy the patterns if I was going to use them.  I failed on the others - they were all maternity patterns, and have made it to the op shop without me so much as checking that all the pieces were there.  This pattern's my chance to redeem myself.  It's for six month old babies, and as the Newbie is now six months (and in need of a new on-line moniker), its now or never!


I bought the pattern for the 'cosy toes' view (top left).  From where I stand it looks fantastic - no more lost socks/booties on the way to school, no more blankets falling off the bottom of the stroller when out for walks, etc.  I pulled it out on the weekend, and found two bonuses:
  • The fact that its an old single-size pattern meant I could use it as-is:  no tracing off the size I was after.  This is one of my least-favourite things about sewing, as it seems like such a long process to go through before getting down to the 'real thing' of cutting and sewing the fabric.
  • The cosy toes pattern isn't actually designed for a six month old, its a 'one size fits all' through to 18 months.  Brilliant.  I've tricked myself into using the pattern, but I'll get to use the product this winter and next.  
I finished it at lunchtime, and from the first trial I guess she's as excited as I am!

I've made it with some polka-dot cotton I bought from Darn Cheap Fabrics a couple of weeks ago, lined with offcuts of bamboo quilt wadding and some solid pink and a tiny bit of floral that's been in my stash for an embarrassingly long time.  I did a butterfly applique on the back, mainly to hold the layers together (the seams do the job elsewhere).  Not being one to reinvent the wheel, the butterfly came from this download.  Now I just need it to stop raining so we can go for a walk and try it out.


LinkWithin

Related Posts Plugin for WordPress, Blogger...