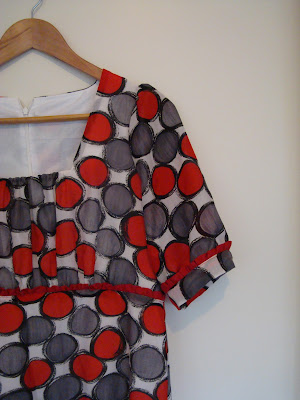
... well one anyway.
This week in my creative space I need to sew in the 2nd one, attach the bottom band and ruffle and tidy up a couple of things (if I say it fast it'll only take 5 minutes to do, right?), and then my spotty dress will be finished! I'm pushing hard to get it done because the Man and I have a date on Sunday (Tim Minchin vs. the MSO) and I think that such a special occasion / rare occurrence is the perfect time to wear the dress for the first time.
What are you up to today? Have you been over to Kirsty's yet?
The how and why of the sleeves:
I decided that the spotty dress (here and here) needed sleeves. My arms need covering from time to time for vanity and more frequently for the weird Melbourne summer we're having. I thought I'd document my approach just in case you'd like to try it:
I chose a shirt with a sleeve that included gathering. This suits the style of the dress, but I also figured that it would be more forgiving of the fact that I was going to put it into a bodice other than the one it was designed for. I used a shirt pattern with a similar fit to the dress. I used the sleeve from View A of this pattern as my starting point.
** A note about notches **
Most likely the notches on your sleeve pattern and the ones on the bodice won't line up. This doesn't matter, and you can ignore them as far as that goes. What's important is that they show you which is the front of the sleeve and which is the back - check out the bodice of the pattern you're lifting them off to see whether the single or double notches are the back. This is important because sleeves aren't quite symmetrical - there's a little more room on the side which joins the back to allow for arm movement. I recommend cutting the notches in the back to help you be sure that they are against the back of your bodice. On my pattern the double notches are on to the back.
I traced the pattern, cut it out of calico, then pinned it into my trial top. It was too long. I had already decided that the best way to make the sleeves blend with the rest of the dress would be to finish them with a band of the spotty fabric with a red ruffle poking out the top of it. I trimmed the calico sleeve so that the bottom of the sleeve would line up with the bottom of the top section of the bodice.
I then re-gathered the bottom of the sleeve, and pinned it into the actual dress. I decided to steal 5mm from the seam allowance of the sleeve in doing so - it just seemed to fit better into the dress. Once I'd done this I realised that I had trimmed too much off the bottom of the sleeve, and need to add about 2cm back (my seam allowances have been 1cm on the dress so far). I also felt that there was too much fullness in the bottom of the sleeve.
I pulled the sleeve back out and reduced the fullness by changing the angle of the underarm seam. I then re-fitted the sleeve (inside out - hence the fact that it's mysteriously changed sides). I also reduced the width of the gathering along the top - I thought it made the gathering look more deliberate and less like ease gone wrong. Once I'd tried it on I adjusted the width of the gathers at the bottom so that I was happy with the look and feel of it.
Removed the sleeve again, measuring the final width of the bottom with the gathers in before removing the gathering thread. I also marked the new positions for the gathering across the top to start and finish.
Transferred the sleeve pattern back onto tissue paper (I wouldn't have worried, but I wanted to be sure that I remembered to add the 2cm back onto the bottom).
I had worked out that the gathered band for the bottom of the dress starts out being twice times the width of the dress. The finished width of the base of my sleeve is 34cm. This means I need bands which finish up being about 3cm wide by 34cm around from the spotty fabric, and red gathered fabric which starts out being 70cm long (including seam allowance), for each sleeve. I made a pattern for each, then cut out and assembled as per the rest of the dress.
A longer process than I would usually be bothered with (particularly when you add the trial top into the mix), but I'm glad I made the effort, and maybe it'll give me more courage to personalise things in the future.


No comments:
Post a Comment
Thanks for commenting - I love comments!